C2C User Manual
Project Dashboard
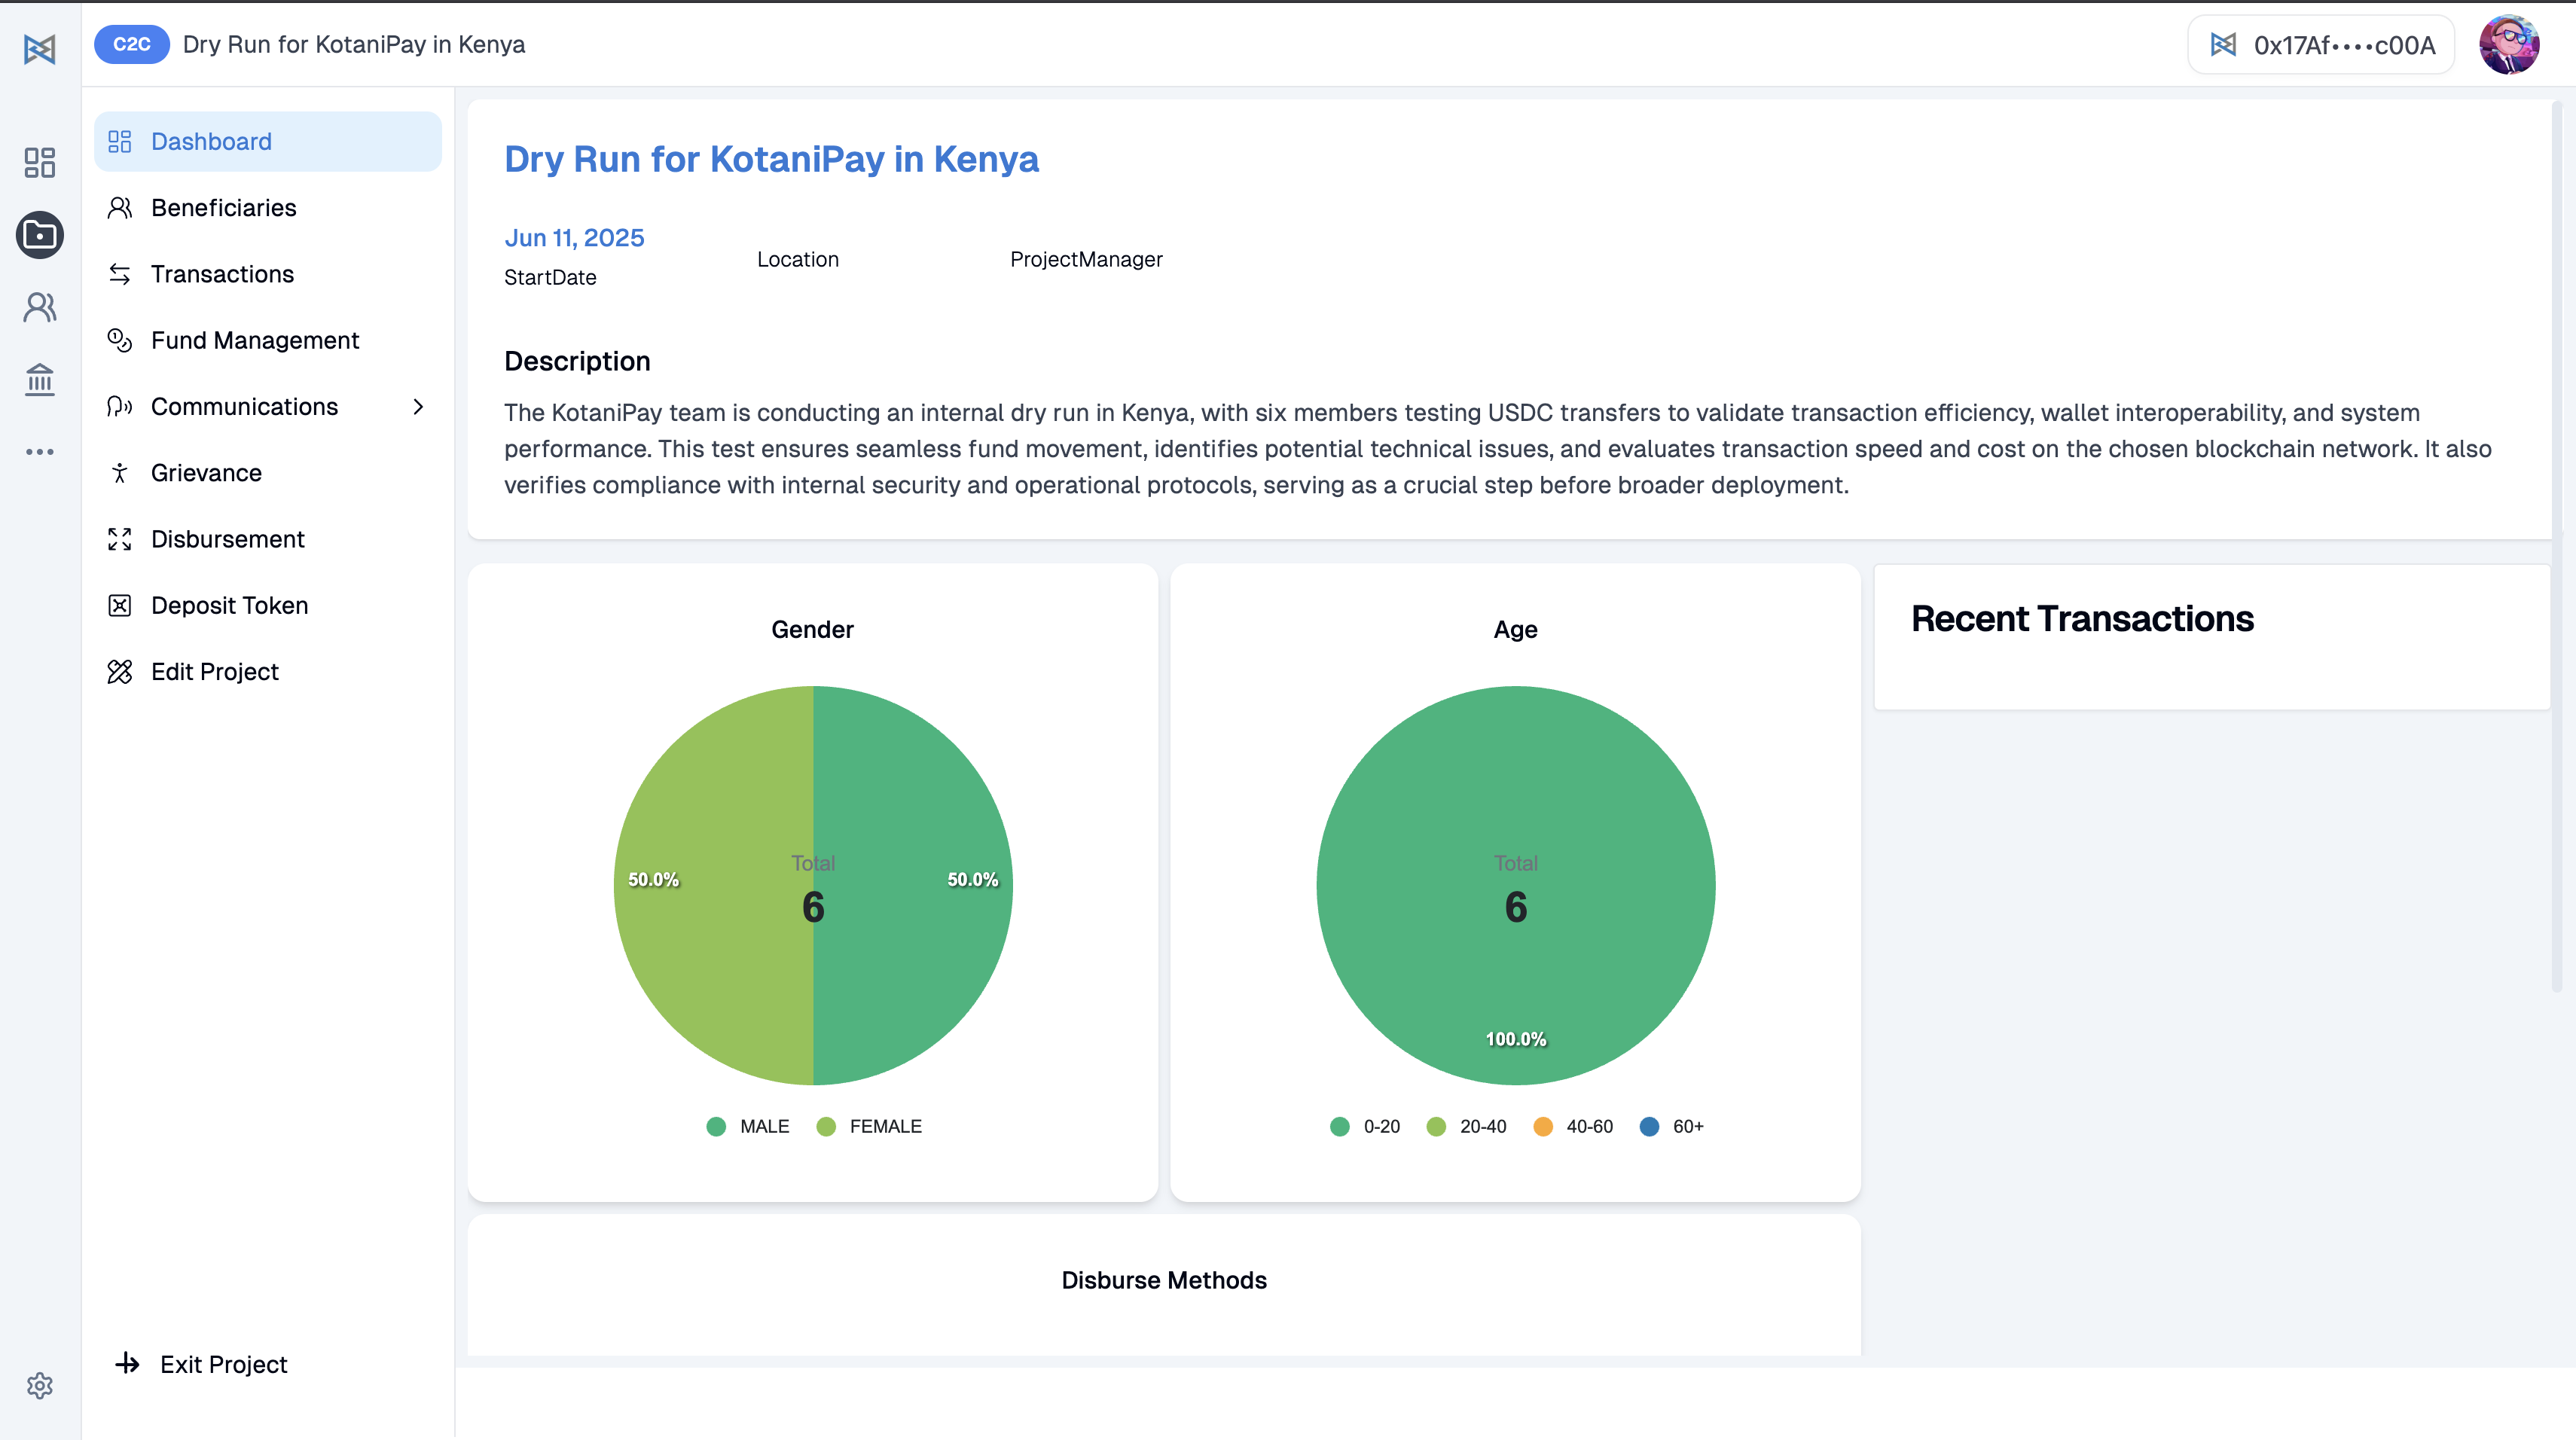
When you log into the Rahat Dashboard and open a specific project, the Project Dashboard provides an at-a-glance overview of all key details and progress.
Navigation Menu
The left-hand navigation menu includes the following options:
| Menu Item | Description |
|---|---|
| Dashboard | Overview and key metrics |
| Beneficiaries | Manage beneficiary data |
| Transactions | View transaction history |
| Fund Management | Manage project funds |
| Communications | Send SMS notifications |
| Grievance | Handle complaints and issues |
| Disbursement | Distribute funds to beneficiaries |
| Deposit Token | Add funds to project |
| Edit Project | Modify project settings |
These sections allow you to manage beneficiaries, allocate and disburse funds, send notifications via SMS and monitor project performance.
Main Dashboard View
The main dashboard view displays important project information, including:
- Charts showing gender and age distribution among beneficiaries
- Recent transactions and activity logs
- Methods of disbursement being used
- Project statistics and key performance indicators
This makes it easier for project managers and administrators to quickly assess the project's overall status and activity.
Project Setup
Before you can begin sending USDC (crypto aid) to your beneficiaries, the project needs to be properly configured. This involves selecting the blockchain network and setting up your treasury (where your funds are stored).
🔶 Step 1: Choose the Blockchain Network
Each project must run on a blockchain. Rahat supports EVM-based networks such as:
| Network | Description |
|---|---|
| Ethereum | Mainnet for production deployments |
| Polygon | Layer 2 solution for lower fees |
| Celo | Mobile-first blockchain platform |
This defines where your smart contracts live and where funds will be sent from.
🔐 Step 2: Set Up Gnosis Safe Wallet (If Using Multisig)
If your project uses multi-signature approval for fund disbursement (highly recommended for accountability), you will need a Gnosis Safe wallet.
A Gnosis Safe wallet requires multiple people (signers) to approve each transaction before funds are sent. For example: 2 out of 3 people must approve before the system sends USDC.
⚙️ This setup is done from the backend by the technical team.
📎 Click here to see how to configure Gnosis Safe wallet
Disbursing USDC to Beneficiaries
Once your project is fully set up and beneficiaries have been onboarded, you can begin the process of disbursing USDC. This section will guide you through the steps, options, and considerations for disbursement.
Once your project is set up and beneficiaries are ready, you can start disbursing aid.
Pre-Disbursement Checklist
Make sure:
- ✅ All intended beneficiaries are imported into the system
- ✅ If you're disbursing in bulk, they are grouped properly (e.g., by location or batch)
- ✅ The project setup is complete, including the treasury source and verification of wallet addresses
How to Disburse USDC
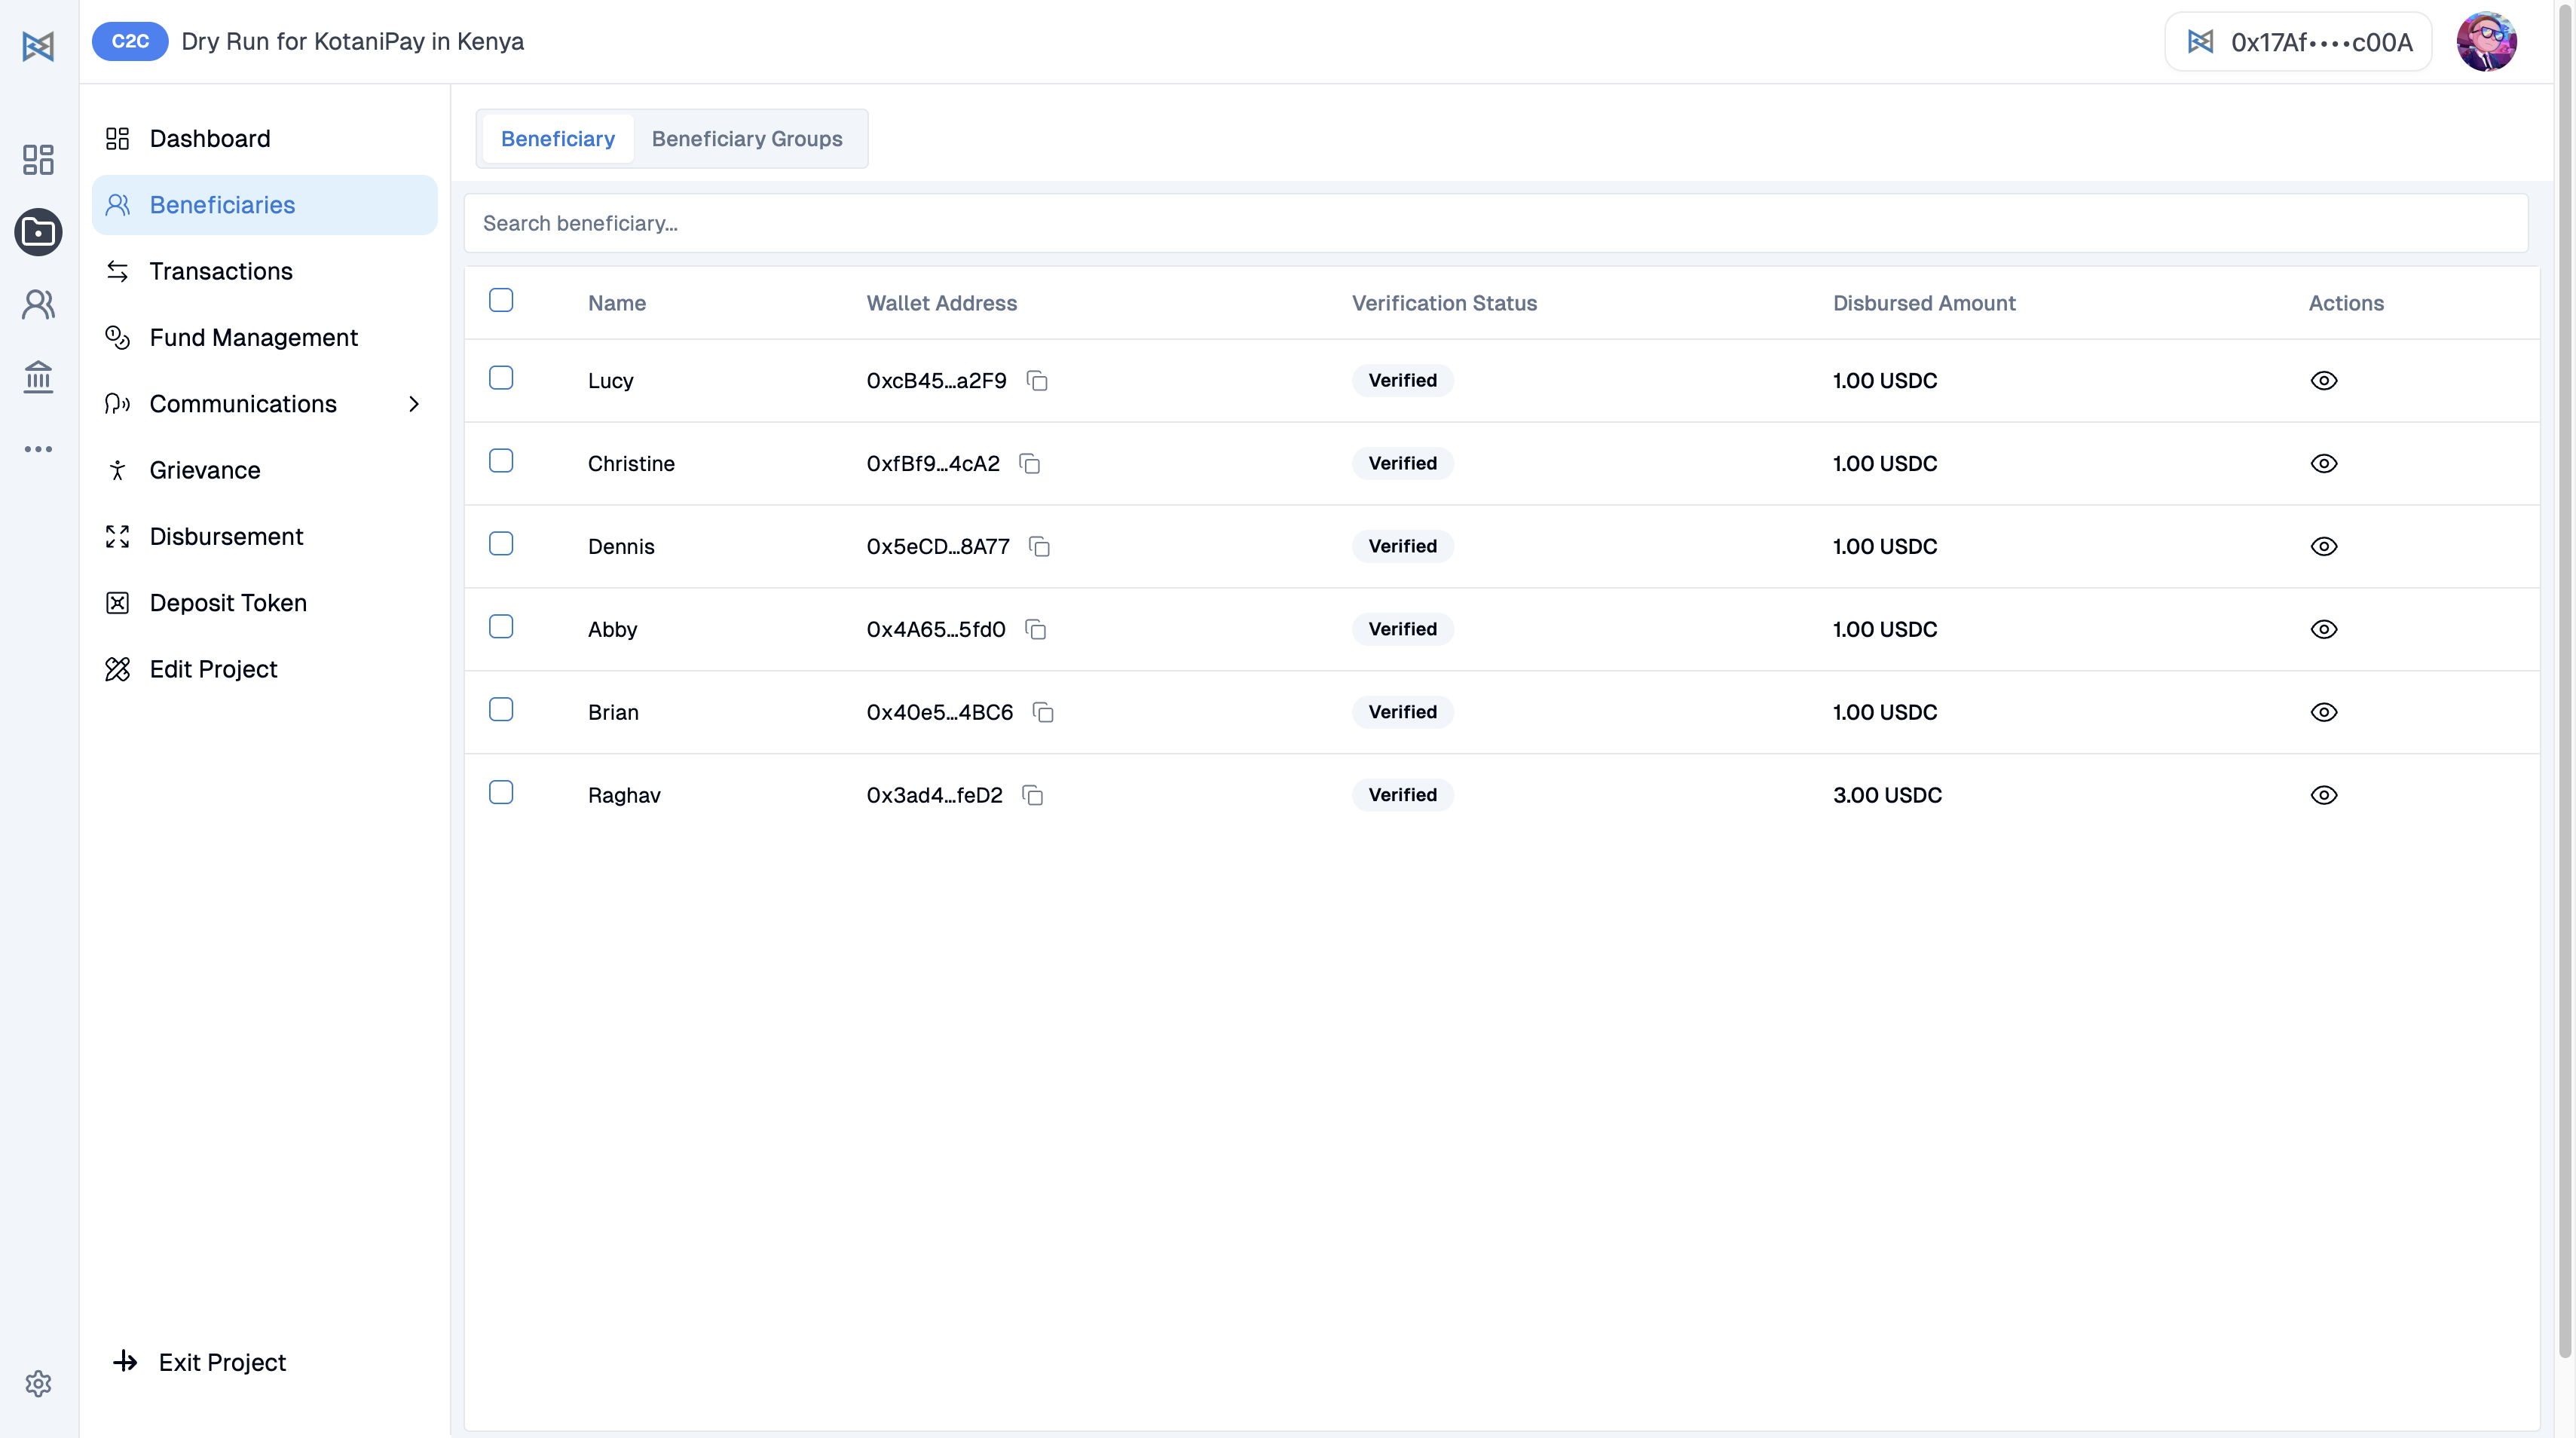
You can disburse funds either individually or in bulk. For an individual disbursement, go to the Beneficiaries section on the sidebar, select the specific beneficiary you want to send funds to, and click the Disburse button. The system will then ask you to choose a treasury source for the transaction.
Treasury Source Options
When initiating disbursement, you must select one of three available treasury sources.
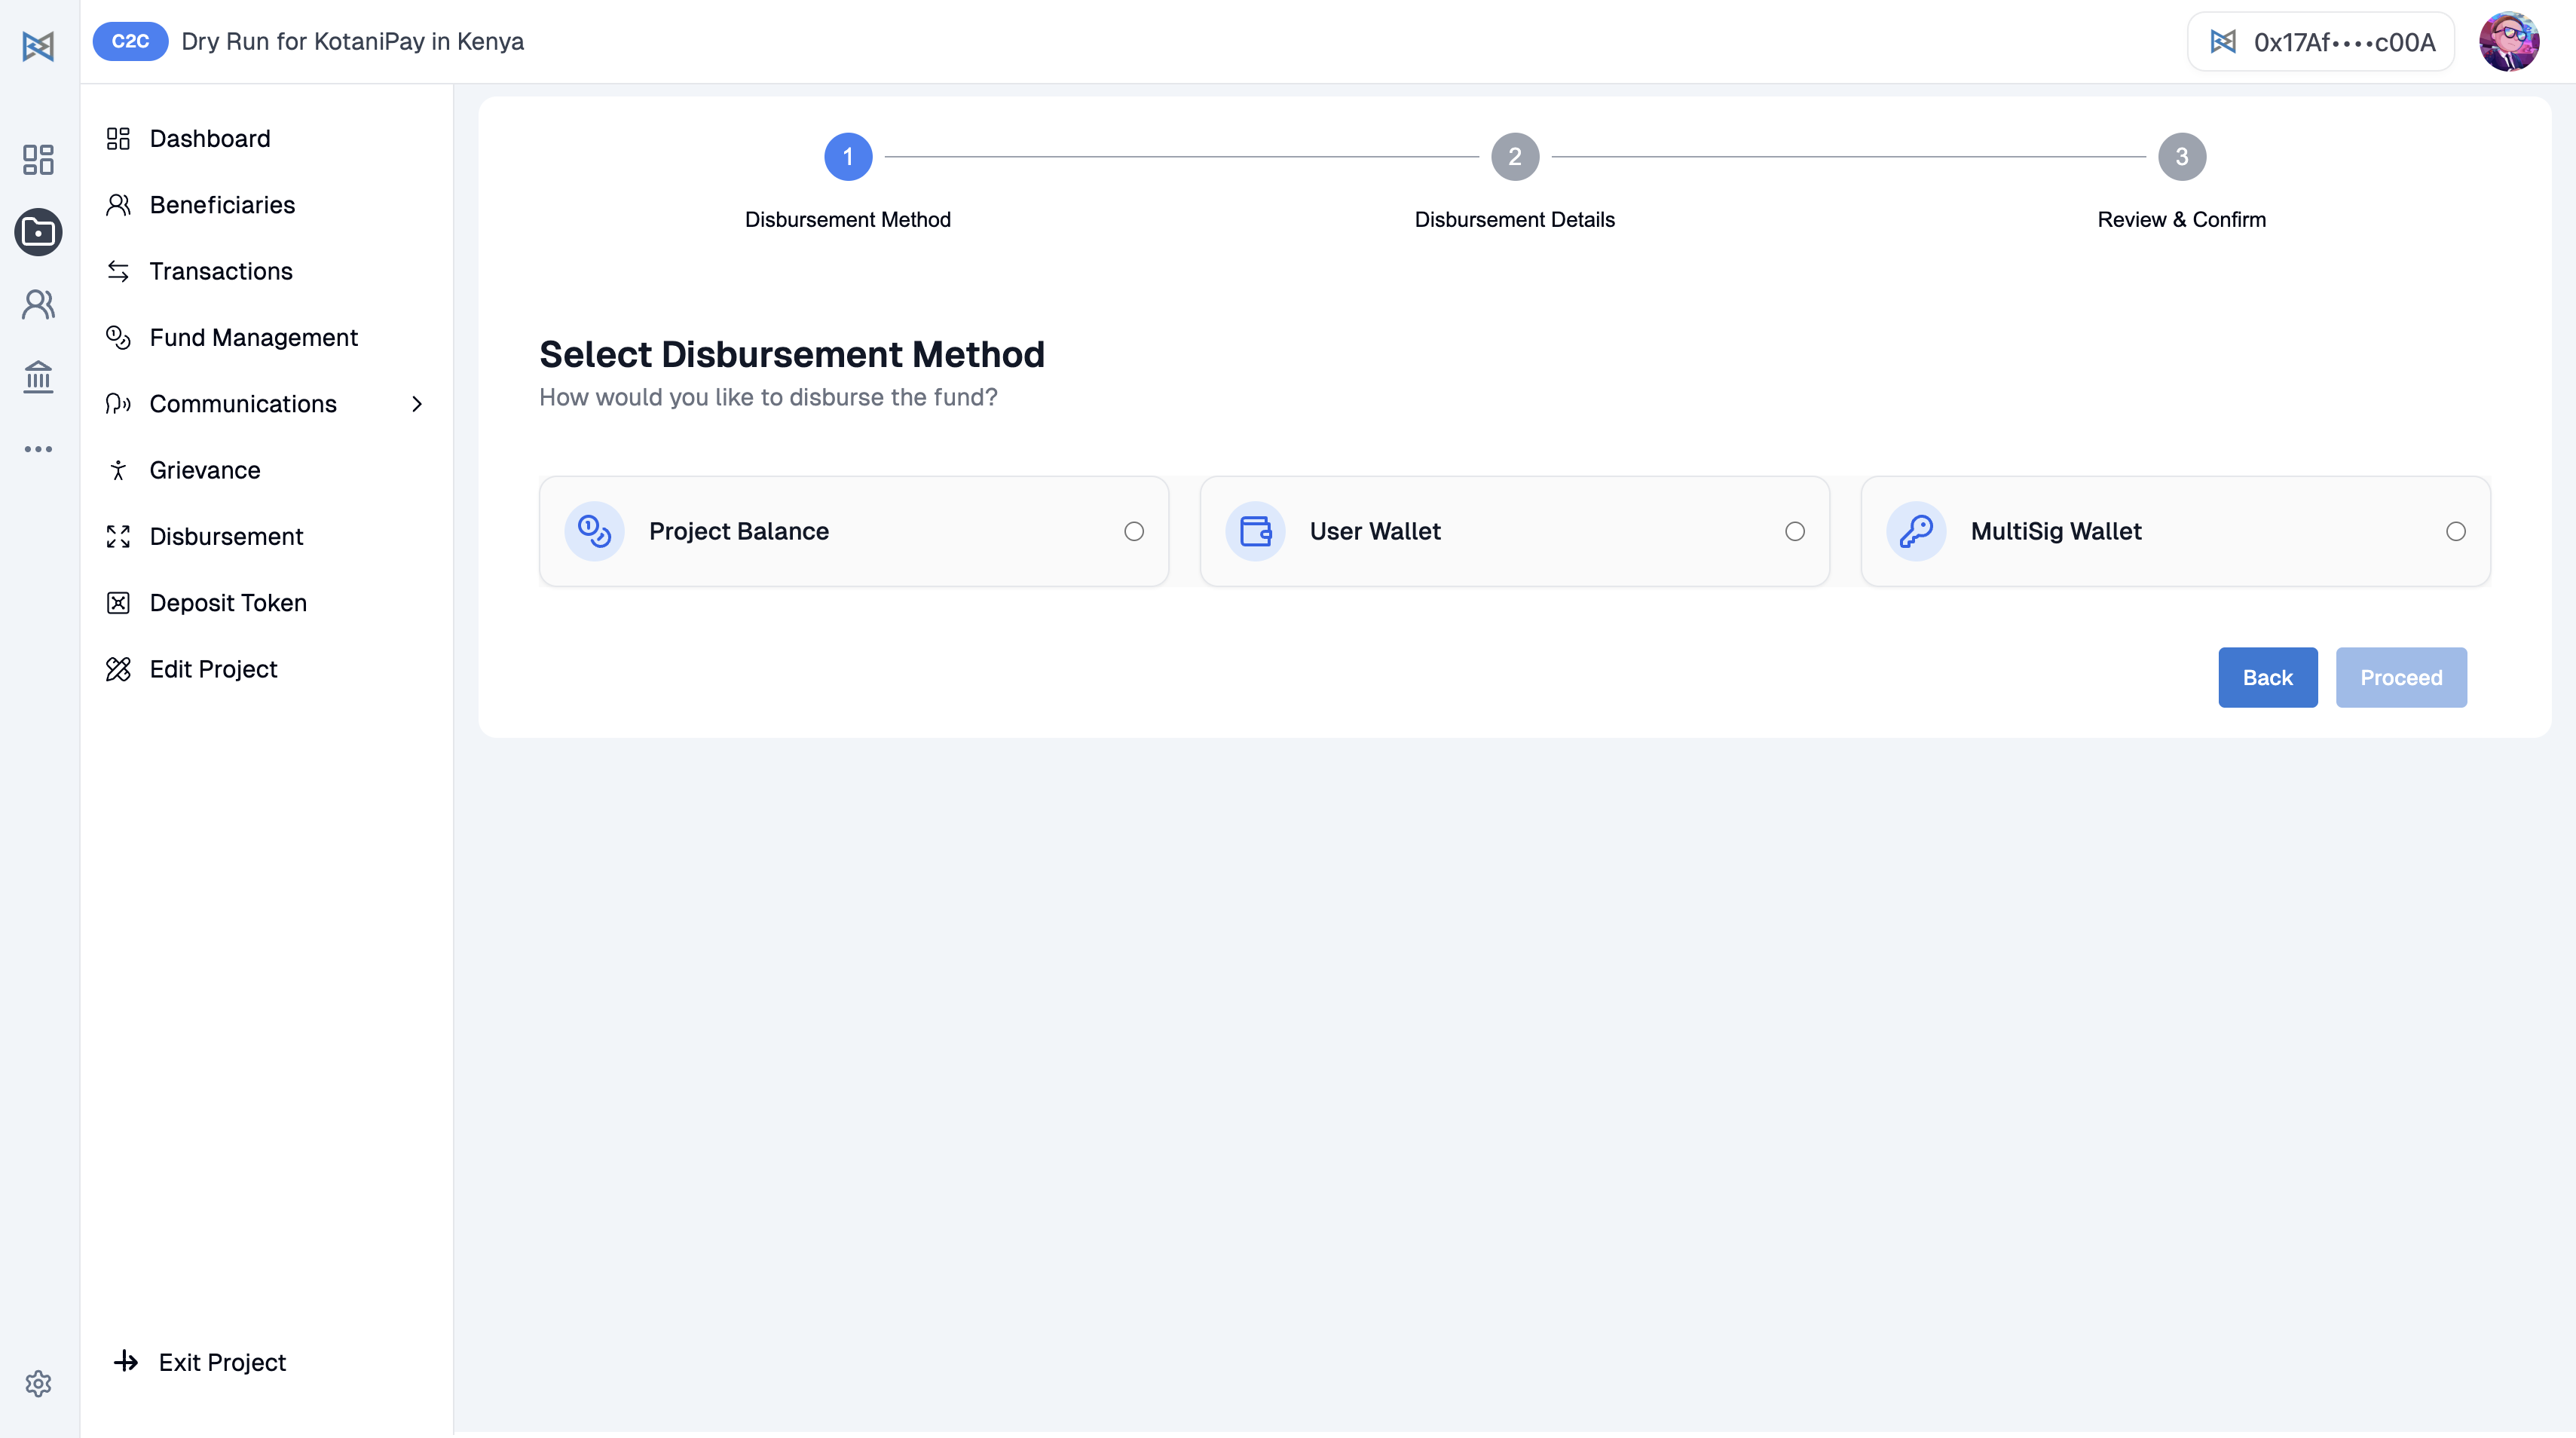
| Treasury Source | Description | Use Case |
|---|---|---|
| Project Balance | Disbursement is executed from a project-specific smart contract. This contract must already be funded with USDC. Once selected, the system automatically sends the funds to the beneficiary directly from this contract. | Standard project operations |
| User Wallet | Funds are sent directly from your connected wallet, such as MetaMask. You must already have USDC in your wallet and will be prompted to connect it before the disbursement can proceed. | Quick individual transfers |
| Multisig Wallet (Gnosis Safe) | Used when teams want added security and accountability. The disbursement requires multiple approvals from authorized signers. Funds are only released once the required number of approvals has been reached. | High-security operations |
Disbursement via Project Balance
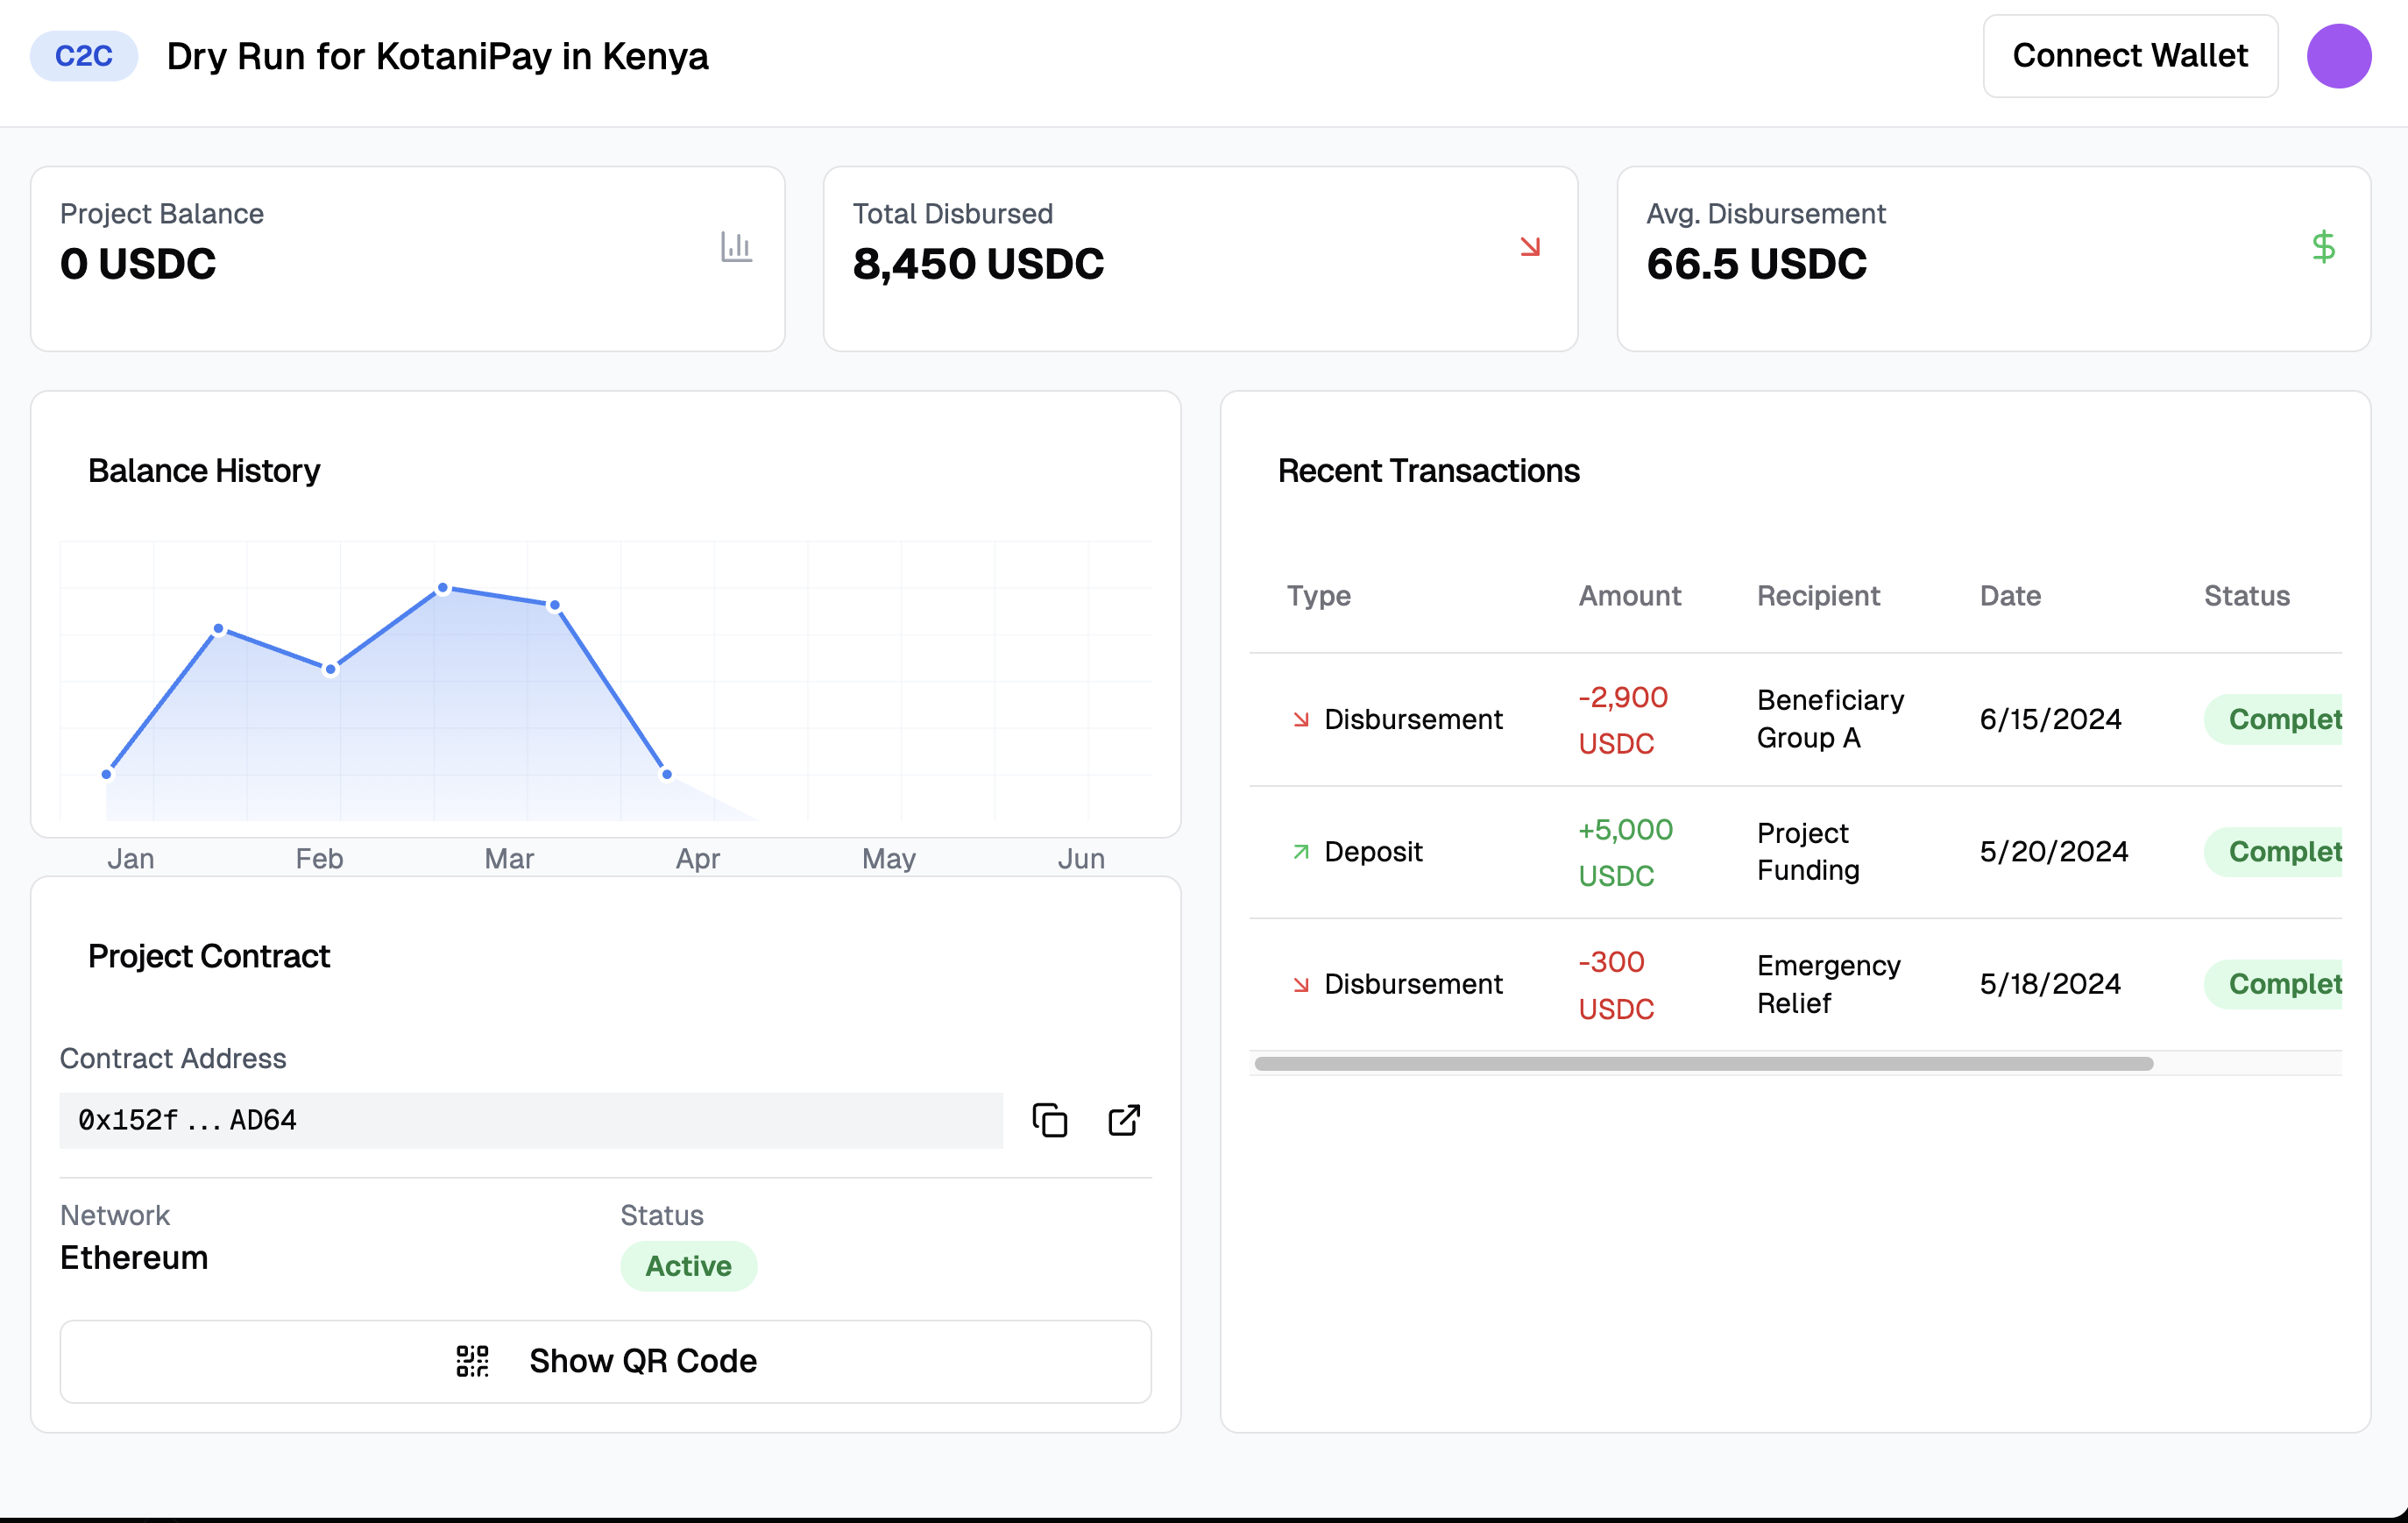
To use the Project Balance method, you must first load funds into the project contract. This is done by navigating to the Fund Management section. From there, you can either copy the project contract address and transfer funds from your wallet or scan the QR code displayed on the dashboard to complete the transfer.
Once the balance has been loaded, you can initiate the disbursement by selecting Project Balance as your treasury source, entering the amount of USDC to distribute, and confirming the transaction.
Disbursement via Multisig Wallet
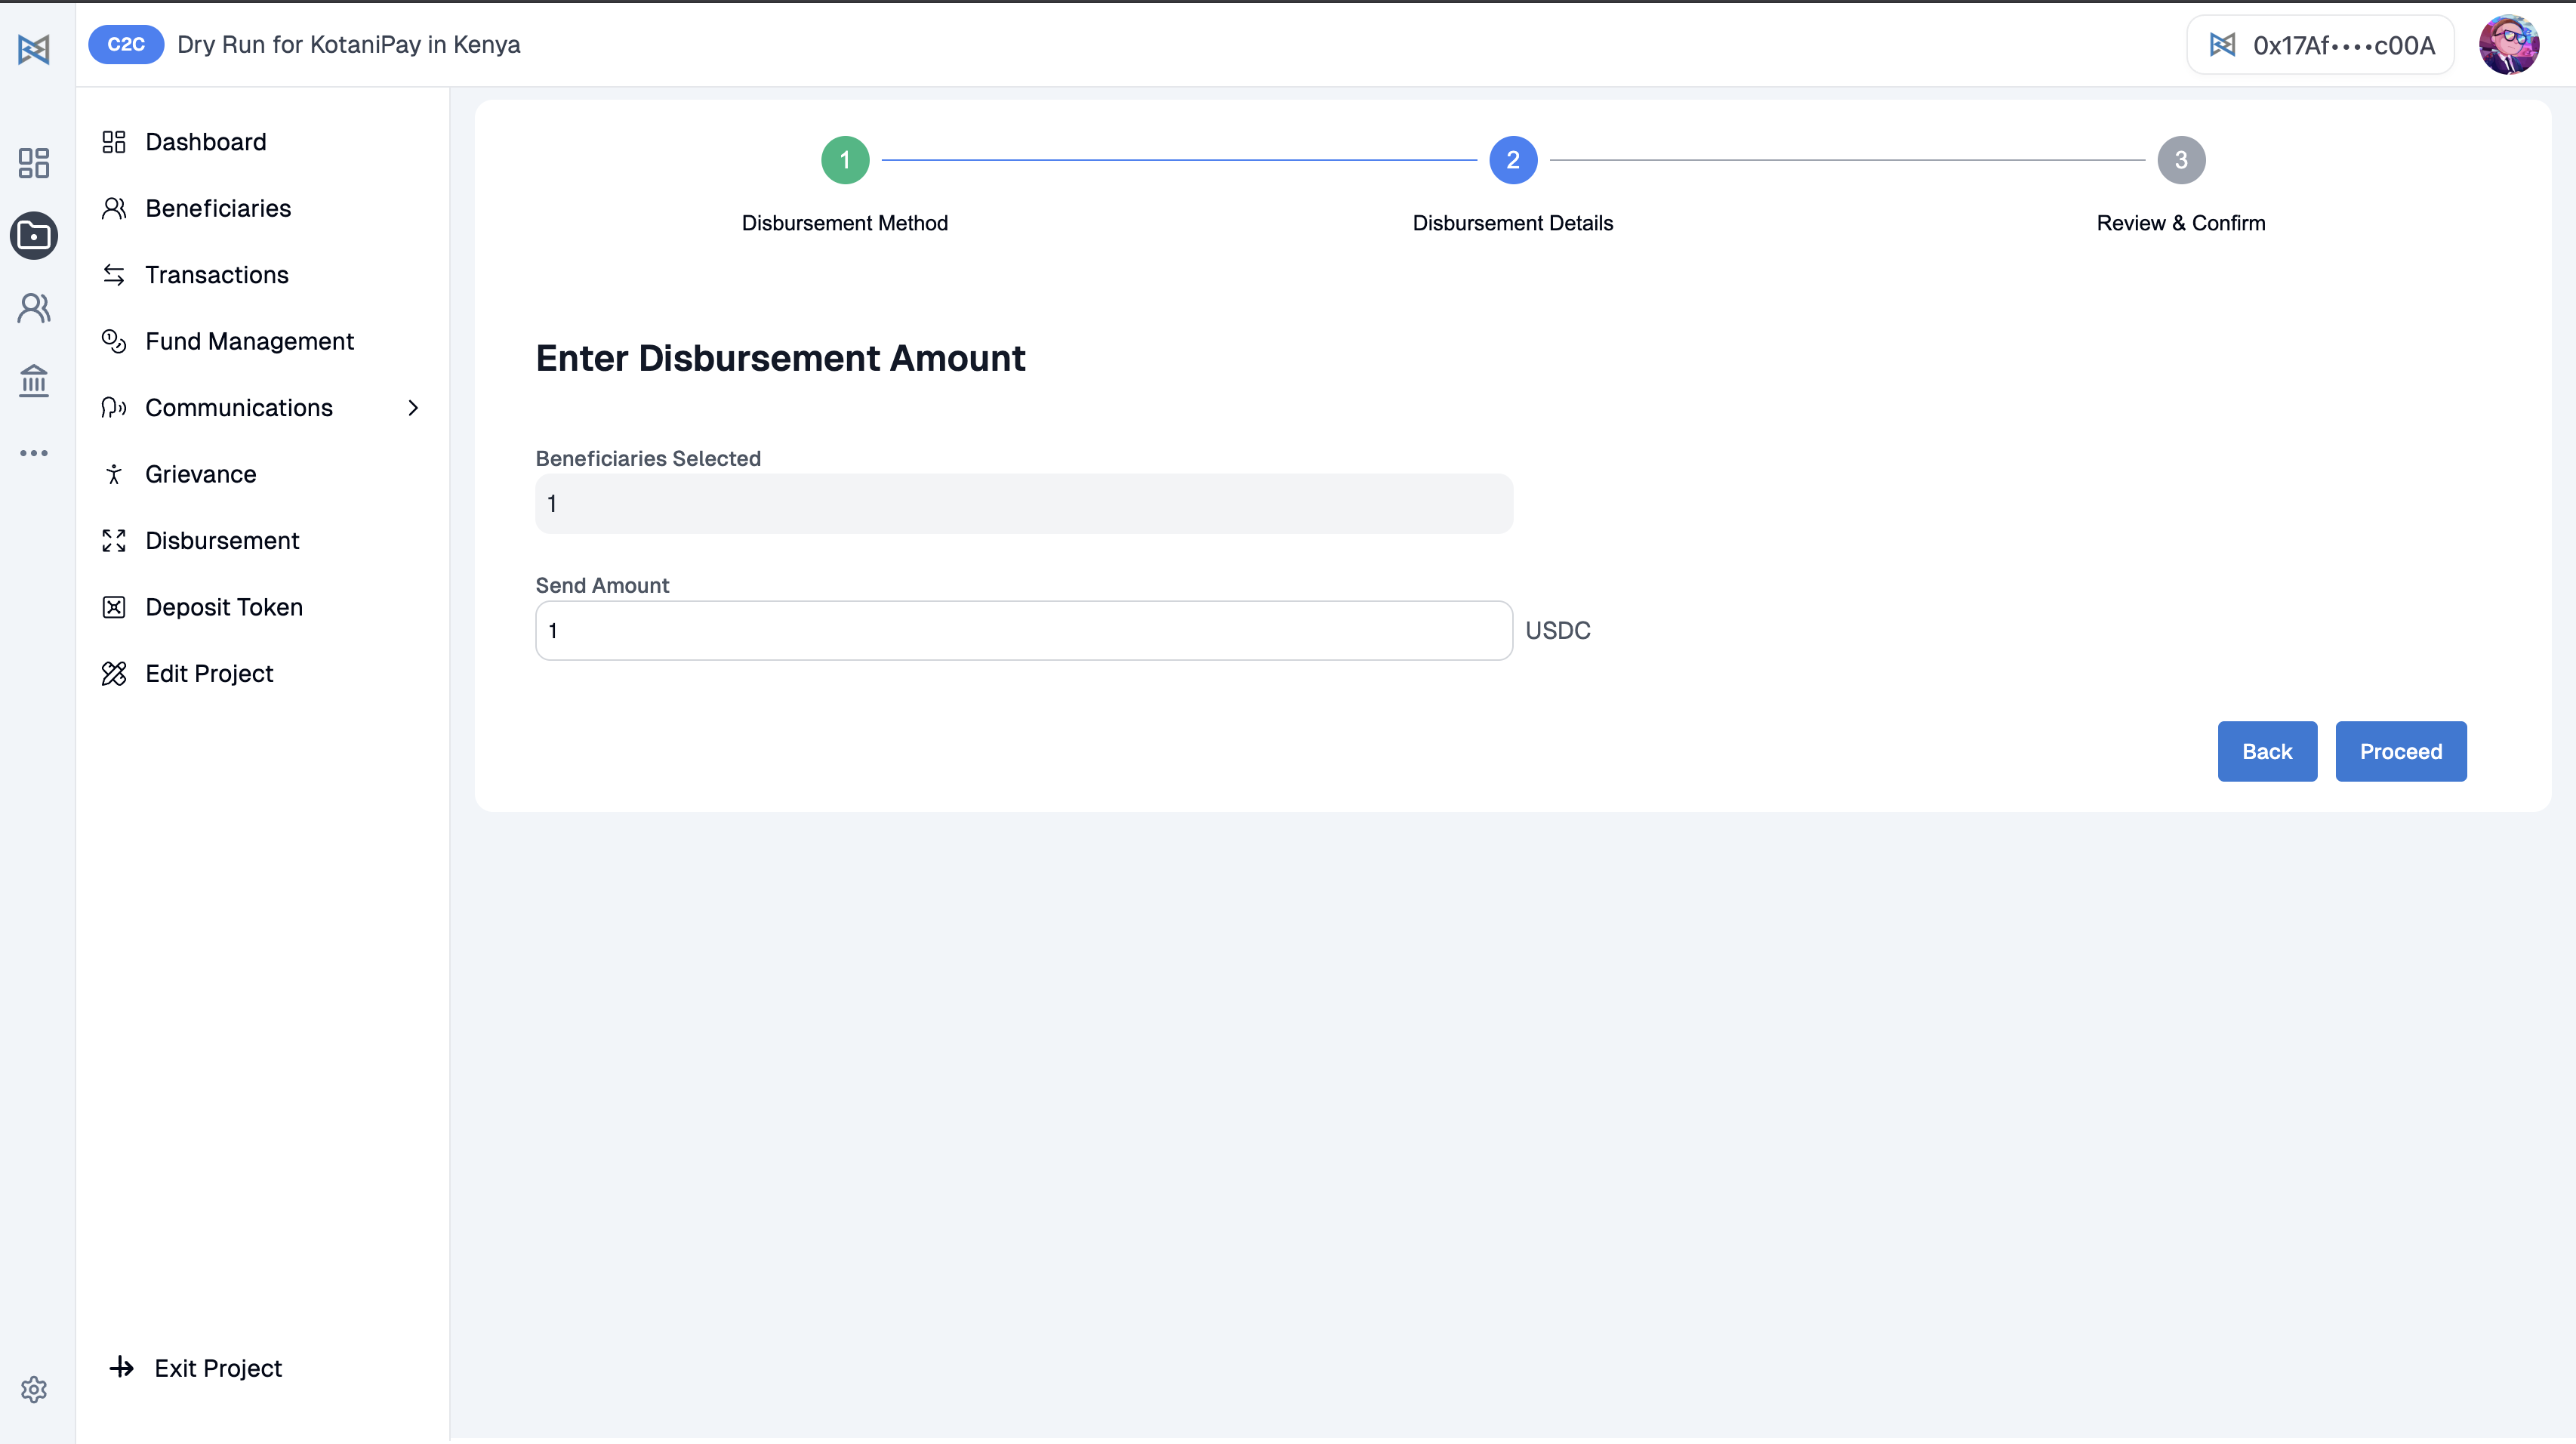 When disbursing through a Multisig Wallet, begin by selecting the Multisig option as your treasury source and entering the amount of USDC you wish to distribute per beneficiary.
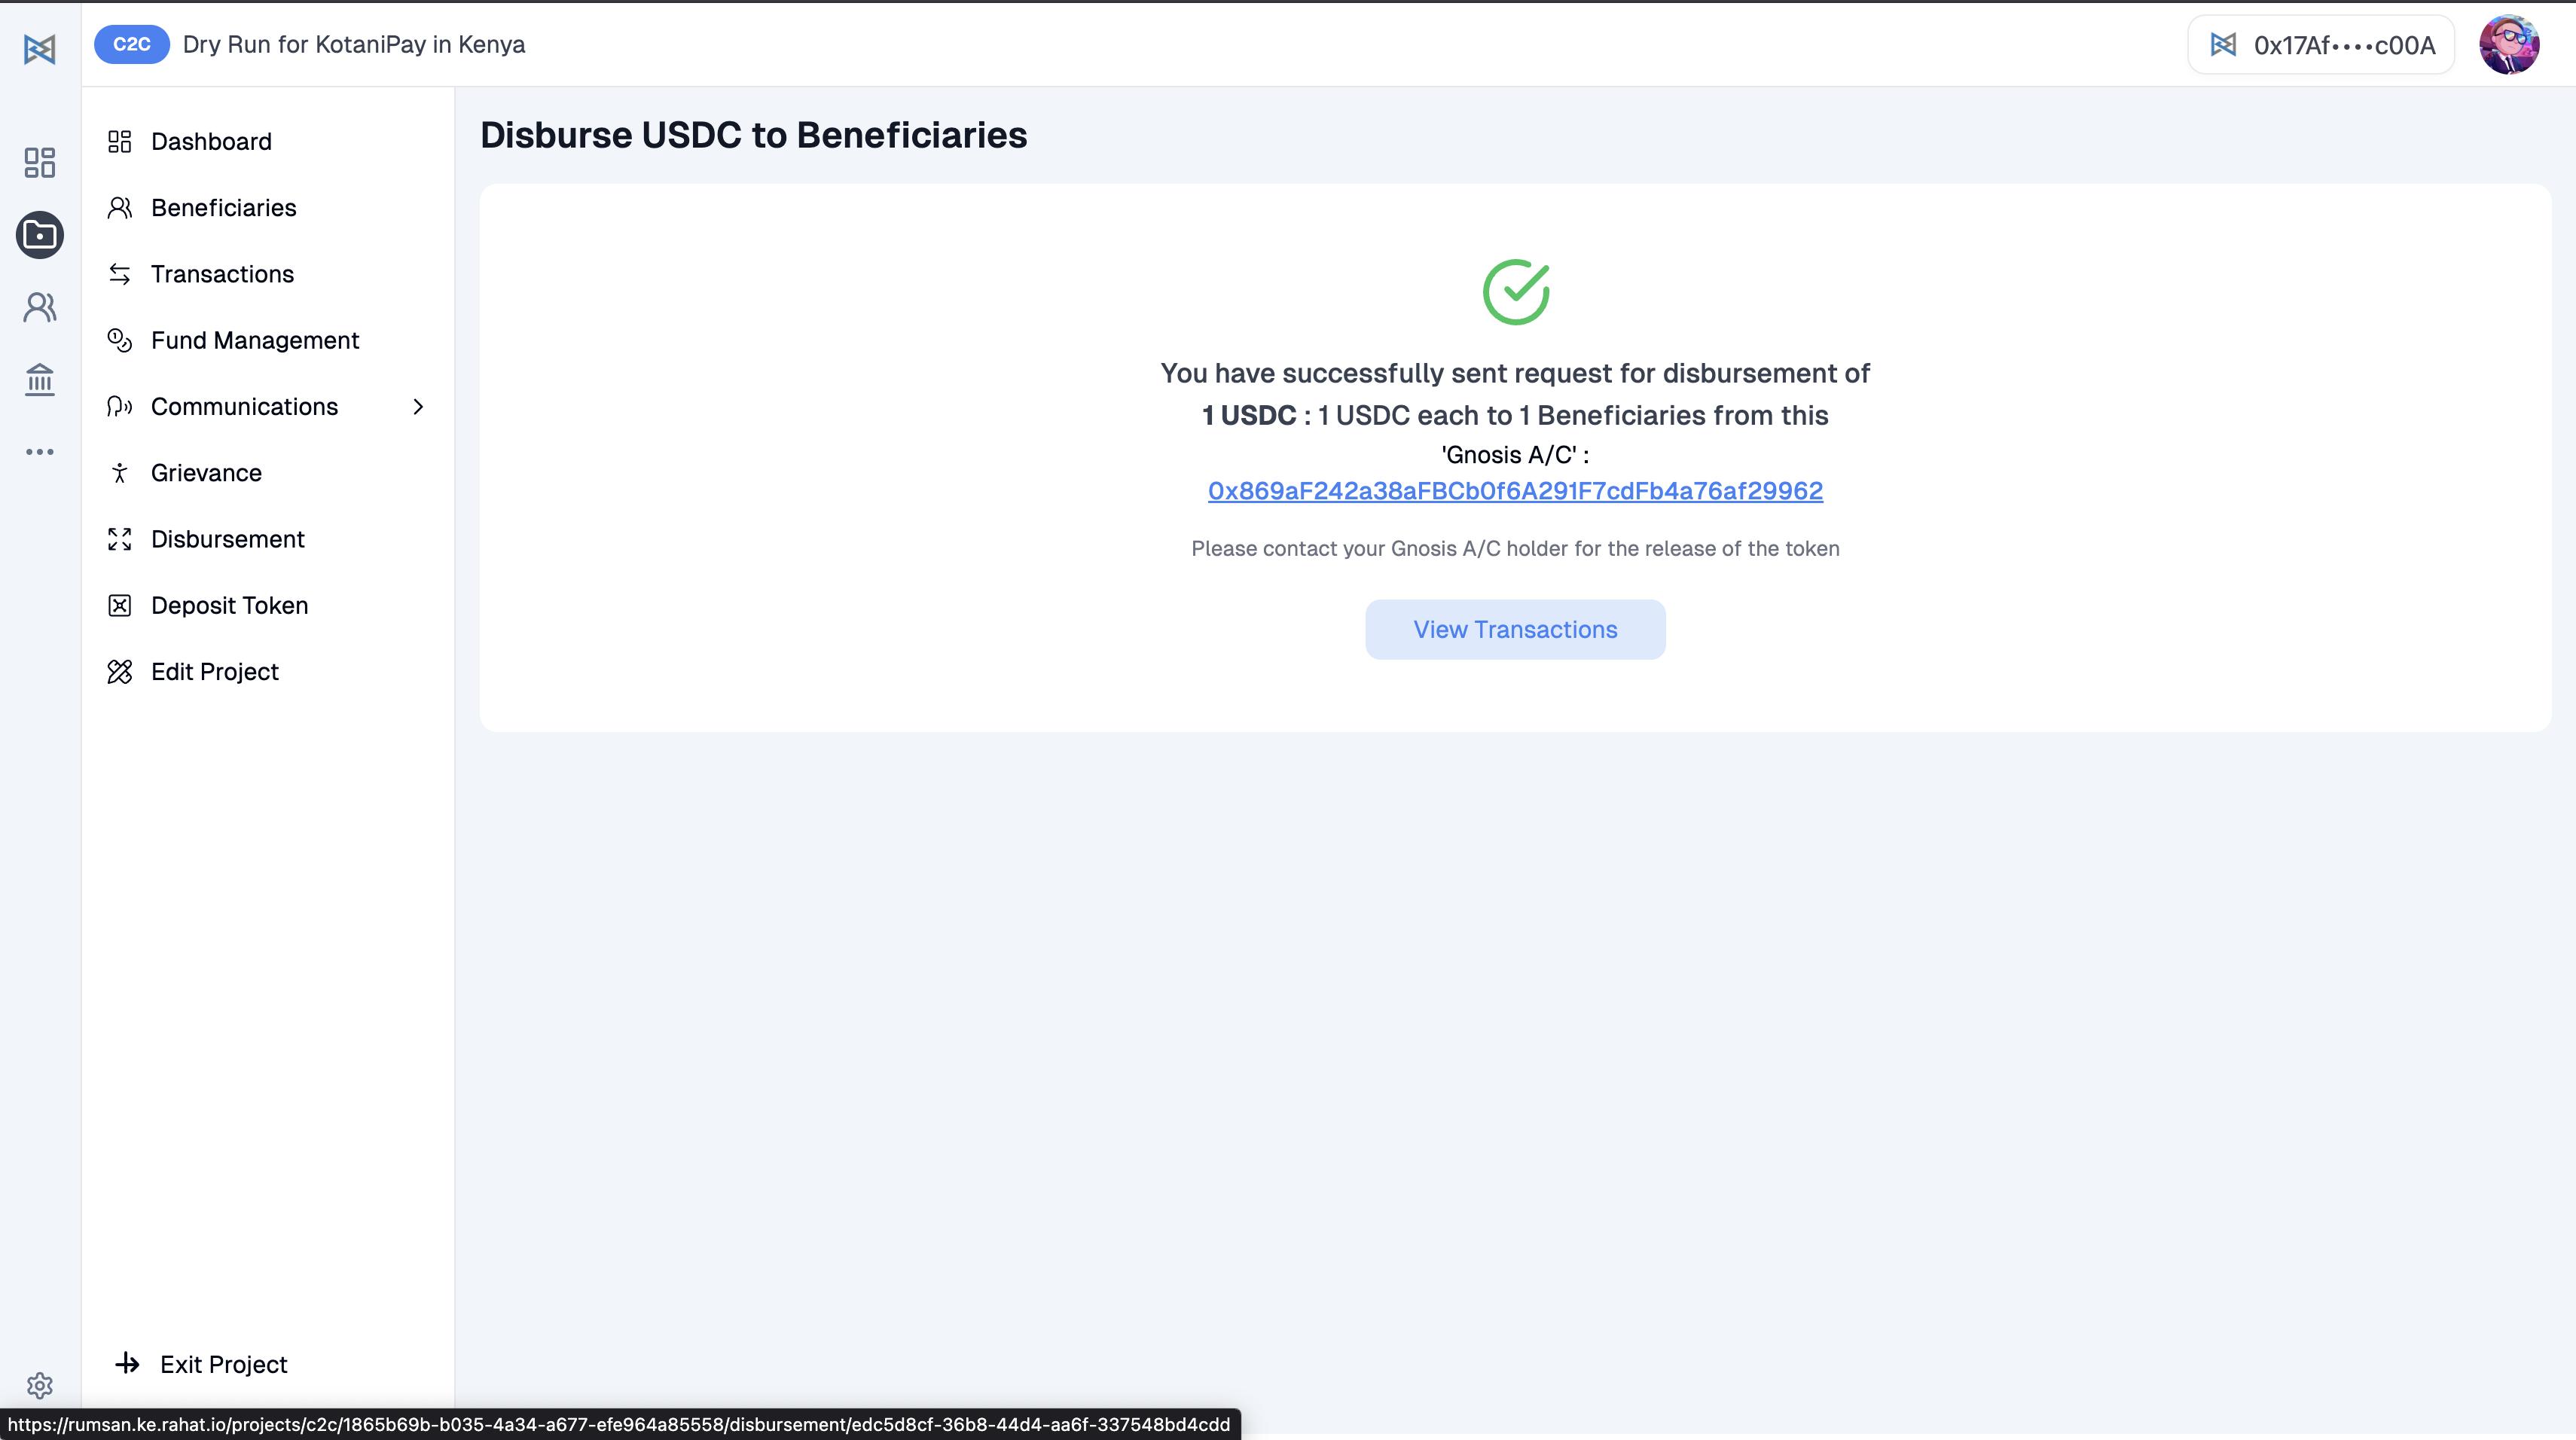
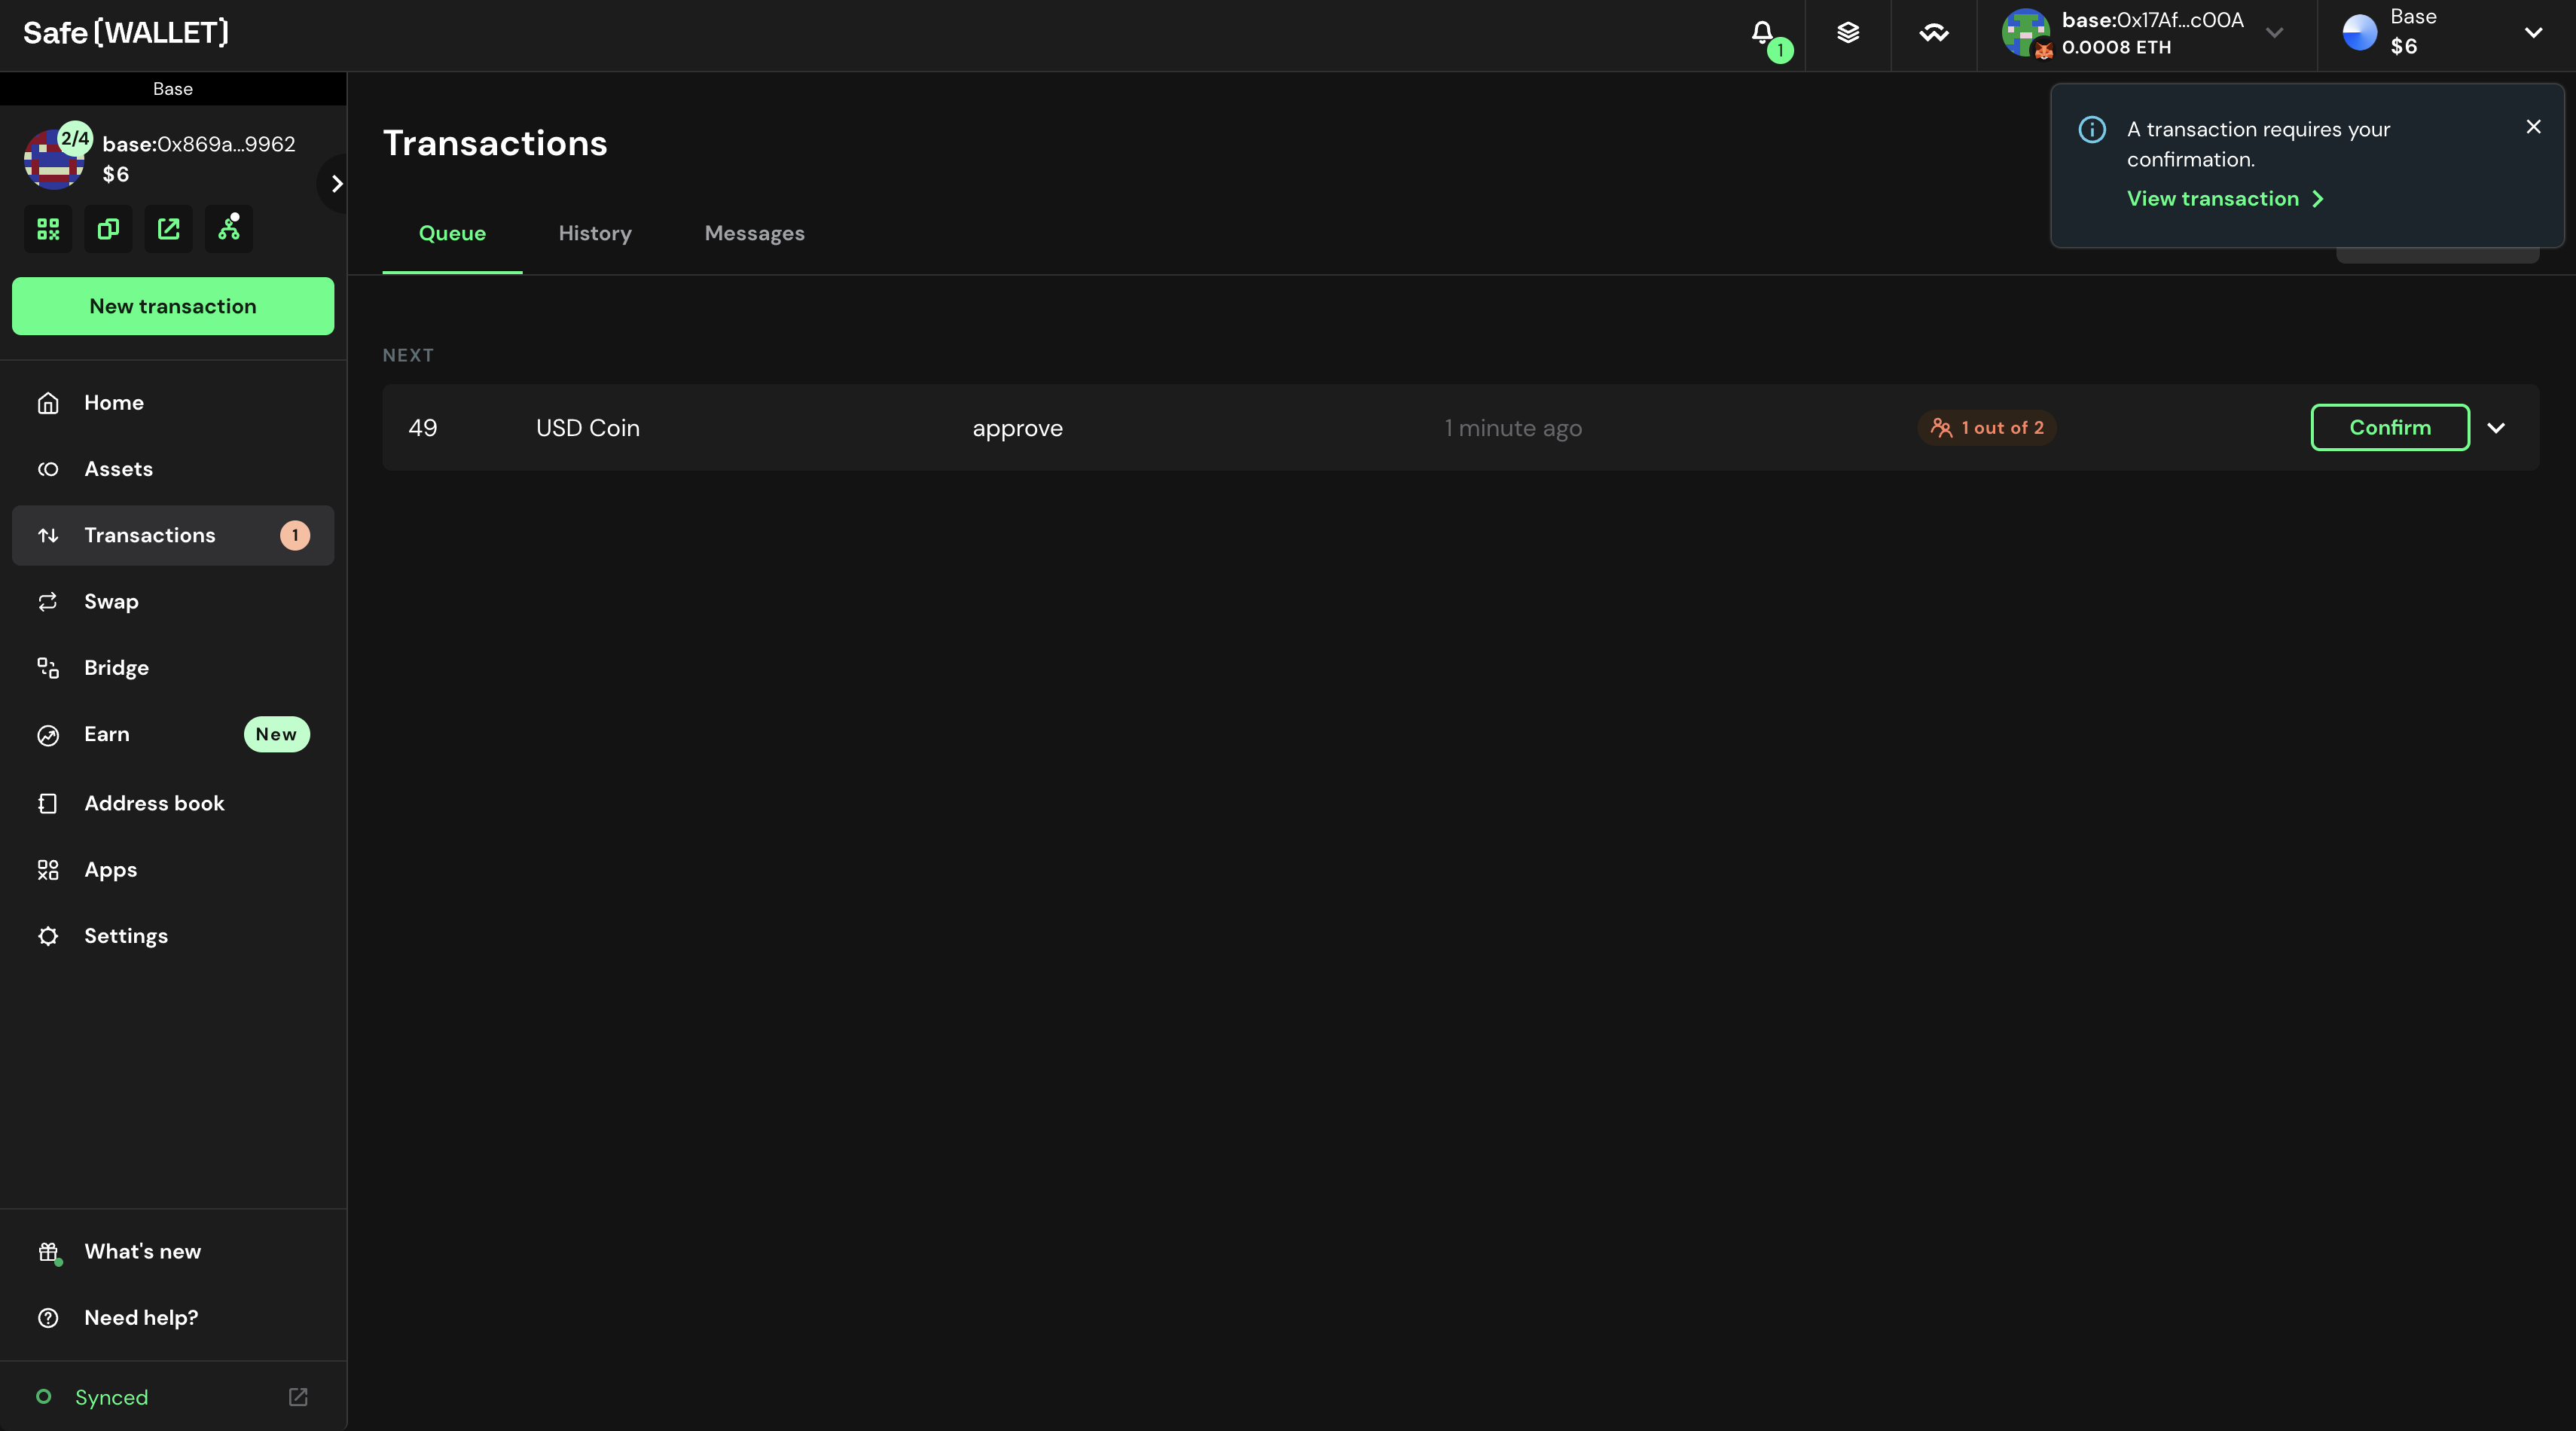
The platform will then create a transaction request and forward it to the Gnosis Safe dashboard. The Safe signers will receive notifications in their Safe Wallet dashboards, and once the required number of signers approve the transaction, it becomes ready for execution.
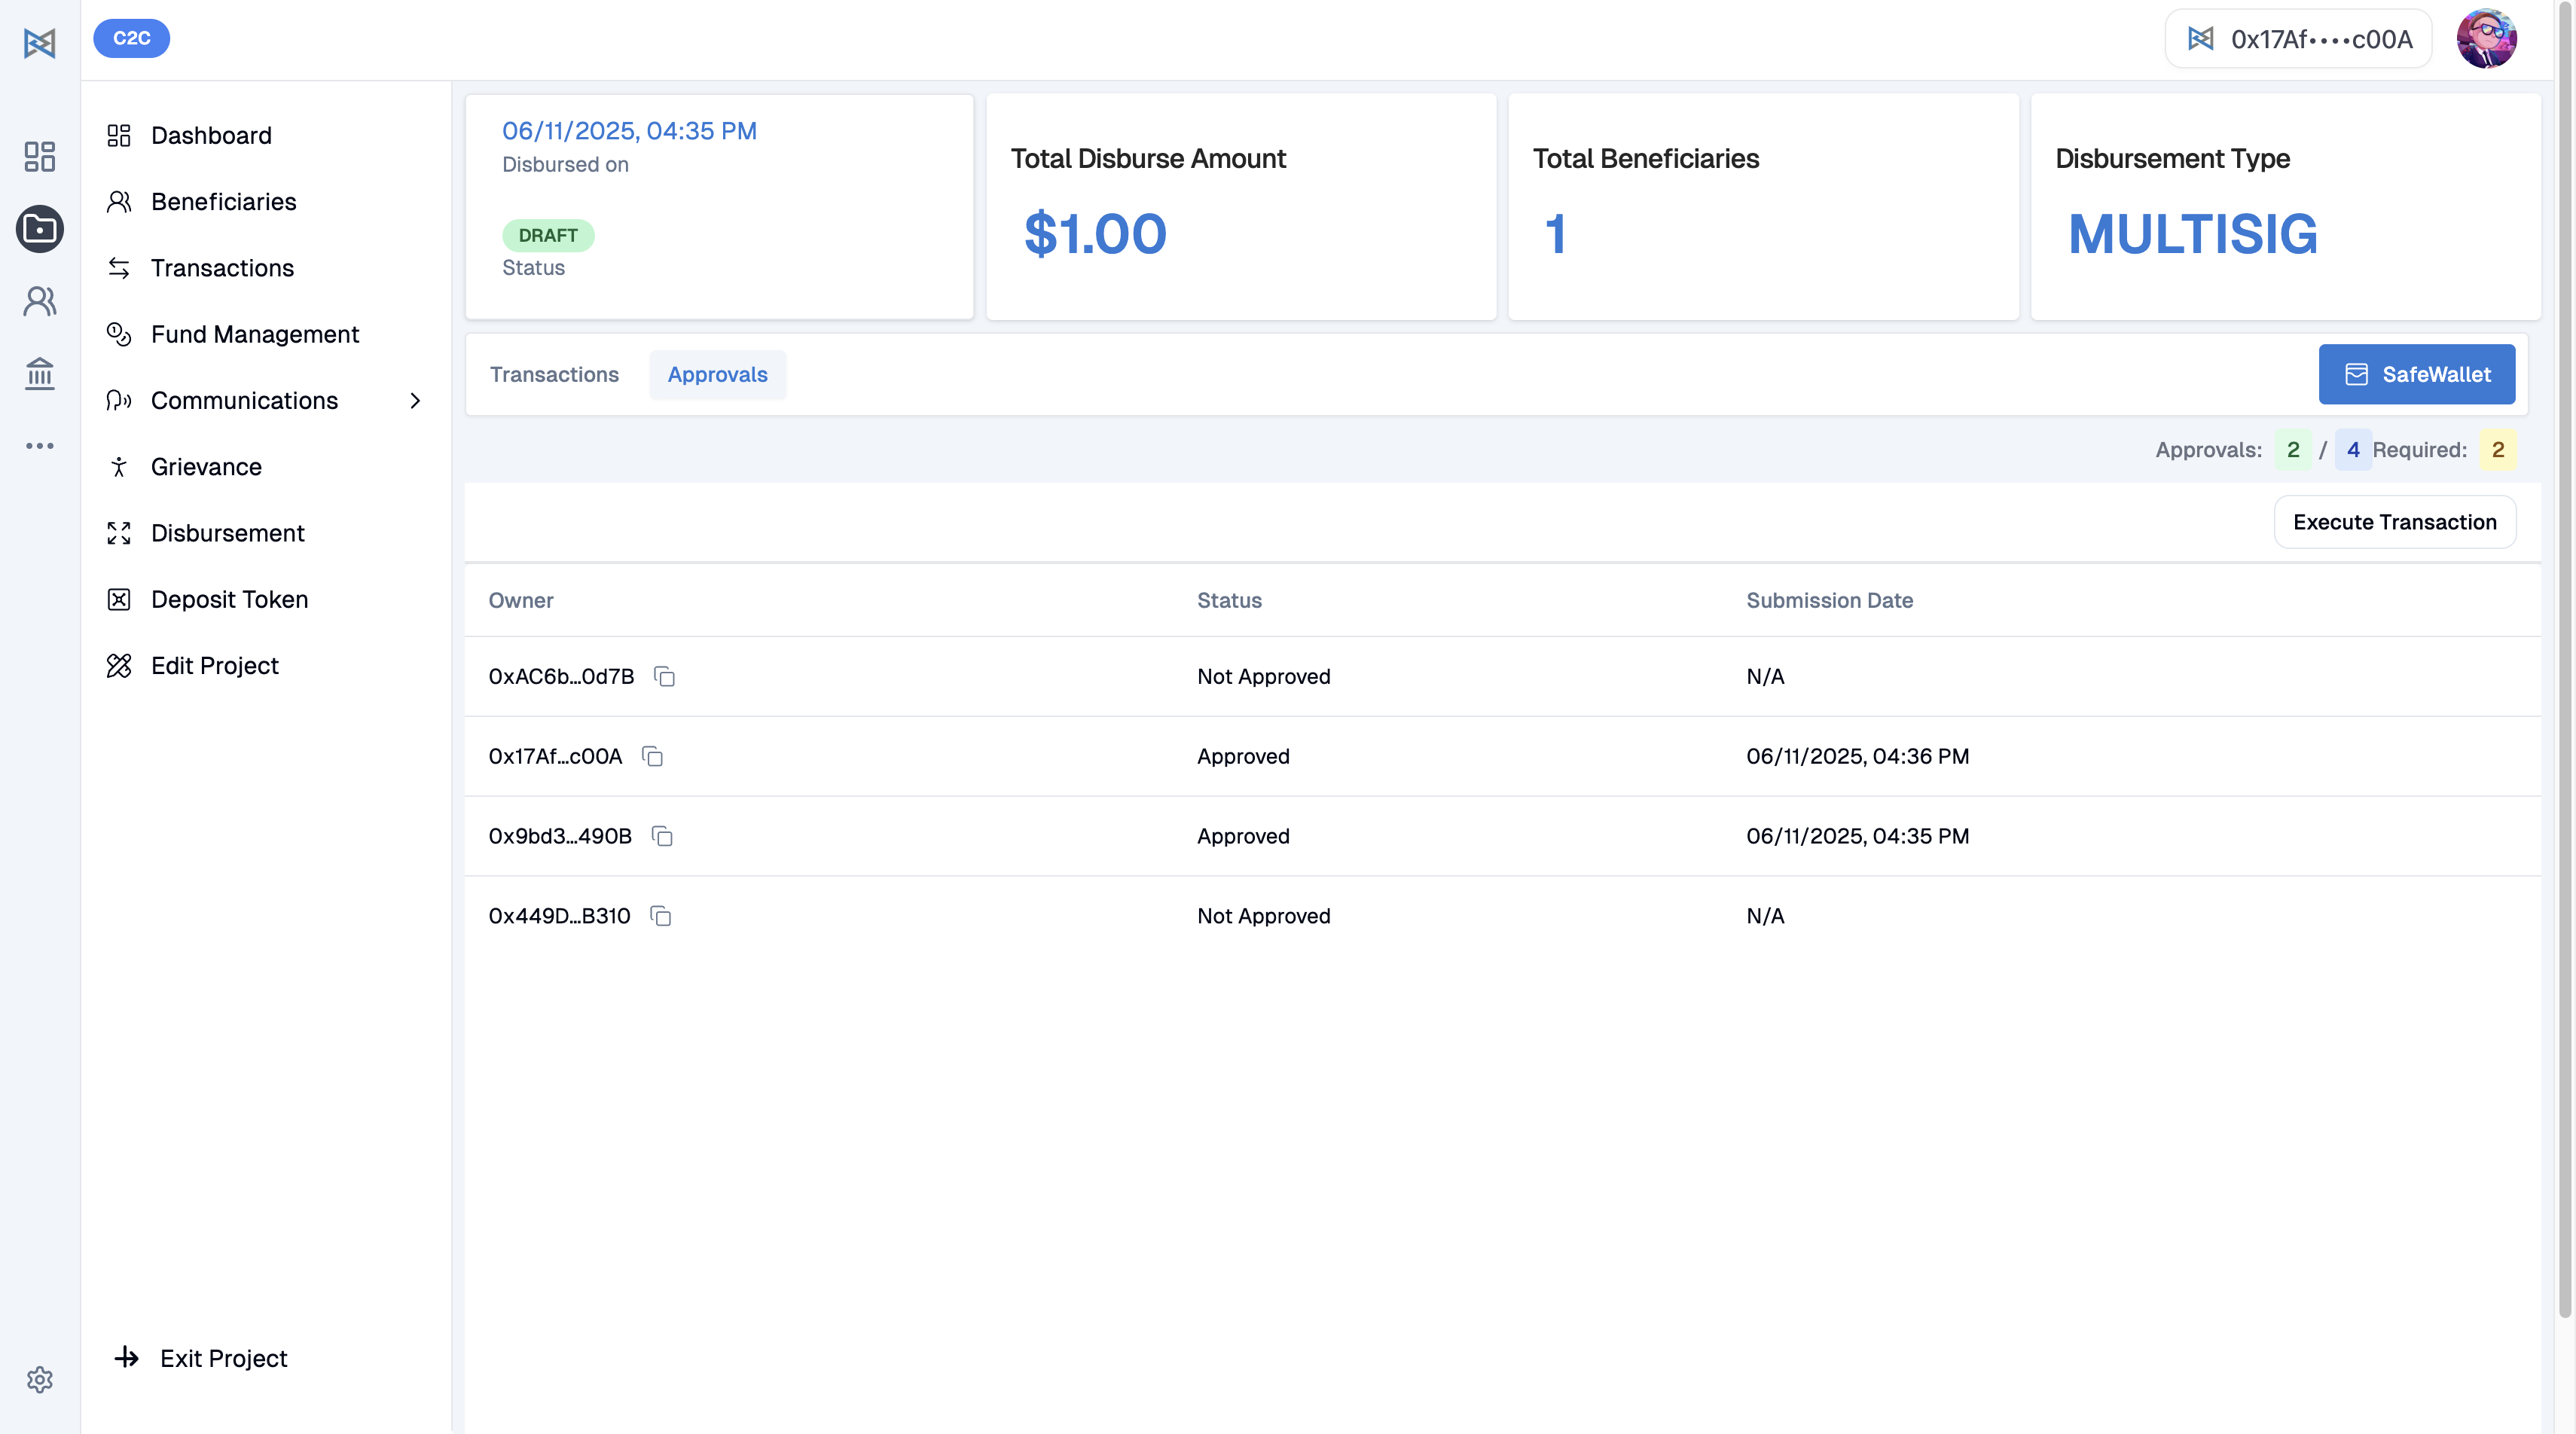
At this stage, return to the Disbursement section, review the transaction details, and click the Execute button. The system will then automatically transfer the funds to each beneficiary's wallet.
Beneficiary Notifications
 Once the disbursement has been completed, beneficiaries will receive a notification message on their registered mobile numbers. This message confirms the amount of USDC transferred and provides guidance on how the funds can be accessed or used. Please note that the exact notification link and format may vary depending on the
Offramping via Rahat Offramping Service
Beneficiaries who have received USDC through the Rahat platform can easily convert their digital tokens into local currency or mobile money using the Rahat Offramping Service. This service provides a secure and user-friendly way for beneficiaries to cash out their digital aid into a format they can immediately use.
How to Start Offramping
Beneficiaries will receive a notification either by email or SMS with a personalized link to begin the offramping process. A sample message might include text along with a clickable link that directs them to the Rahat Offramping Portal.
By clicking on the provided link, beneficiaries are redirected to the secure Rahat Offramping Portal, where they can complete the necessary steps to convert their USDC into fiat or mobile money.
Beneficiary Experience
Once inside the portal, beneficiaries are guided through a step-by-step process that ensures their offramping request is handled correctly. They may need to verify certain details such as their phone number, payment preference, or consent form depending on the requirements of the offramping partner (for example, Kotani Pay). After submission, the request is processed and the equivalent value of USDC is transferred into their mobile money account or local fiat wallet.
Want to Learn More?
For those who want to understand the entire offramping journey from the perspective of beneficiaries, including step-by-step actions and the flow of funds, a separate detailed guide is available.
🔗 How Offramping Works for Beneficiaries
Tracking Offramping Transactions (for Admins)
Every offramping activity carried out through the Rahat Offramping Service is automatically recorded and made visible to project administrators. To review these transactions, an admin must log in to the Rahat Dashboard and open the C2C project dashboard. From there, navigate to the Transactions section and select the Offramping Transaction tab.
In this view, admins will see detailed information for each transaction, including:
- Beneficiary’s name
- Amount of USDC converted
- Fiat amount received
- Blockchain used
- Current transaction status
- Timestamp
This allows the admin team to track progress, resolve any issues, and maintain a transparent record of all conversions.

Offramping USDC from Rahat
Overview
The Rahat Crypto Offramping Module allows beneficiaries to convert their received USDC into local mobile money or fiat currency through integrated third-party services. Rahat is designed to be flexible, integrating with multiple offramping providers, such as Kotani Pay, Transak, on/off-ramp aggregators, and mobile wallet APIs. Each provider may have its own unique flow, supported networks, and compliance requirements. This guide focuses specifically on offramping USDC using Kotani Pay.
How to Offramp USDC via Kotani Pay
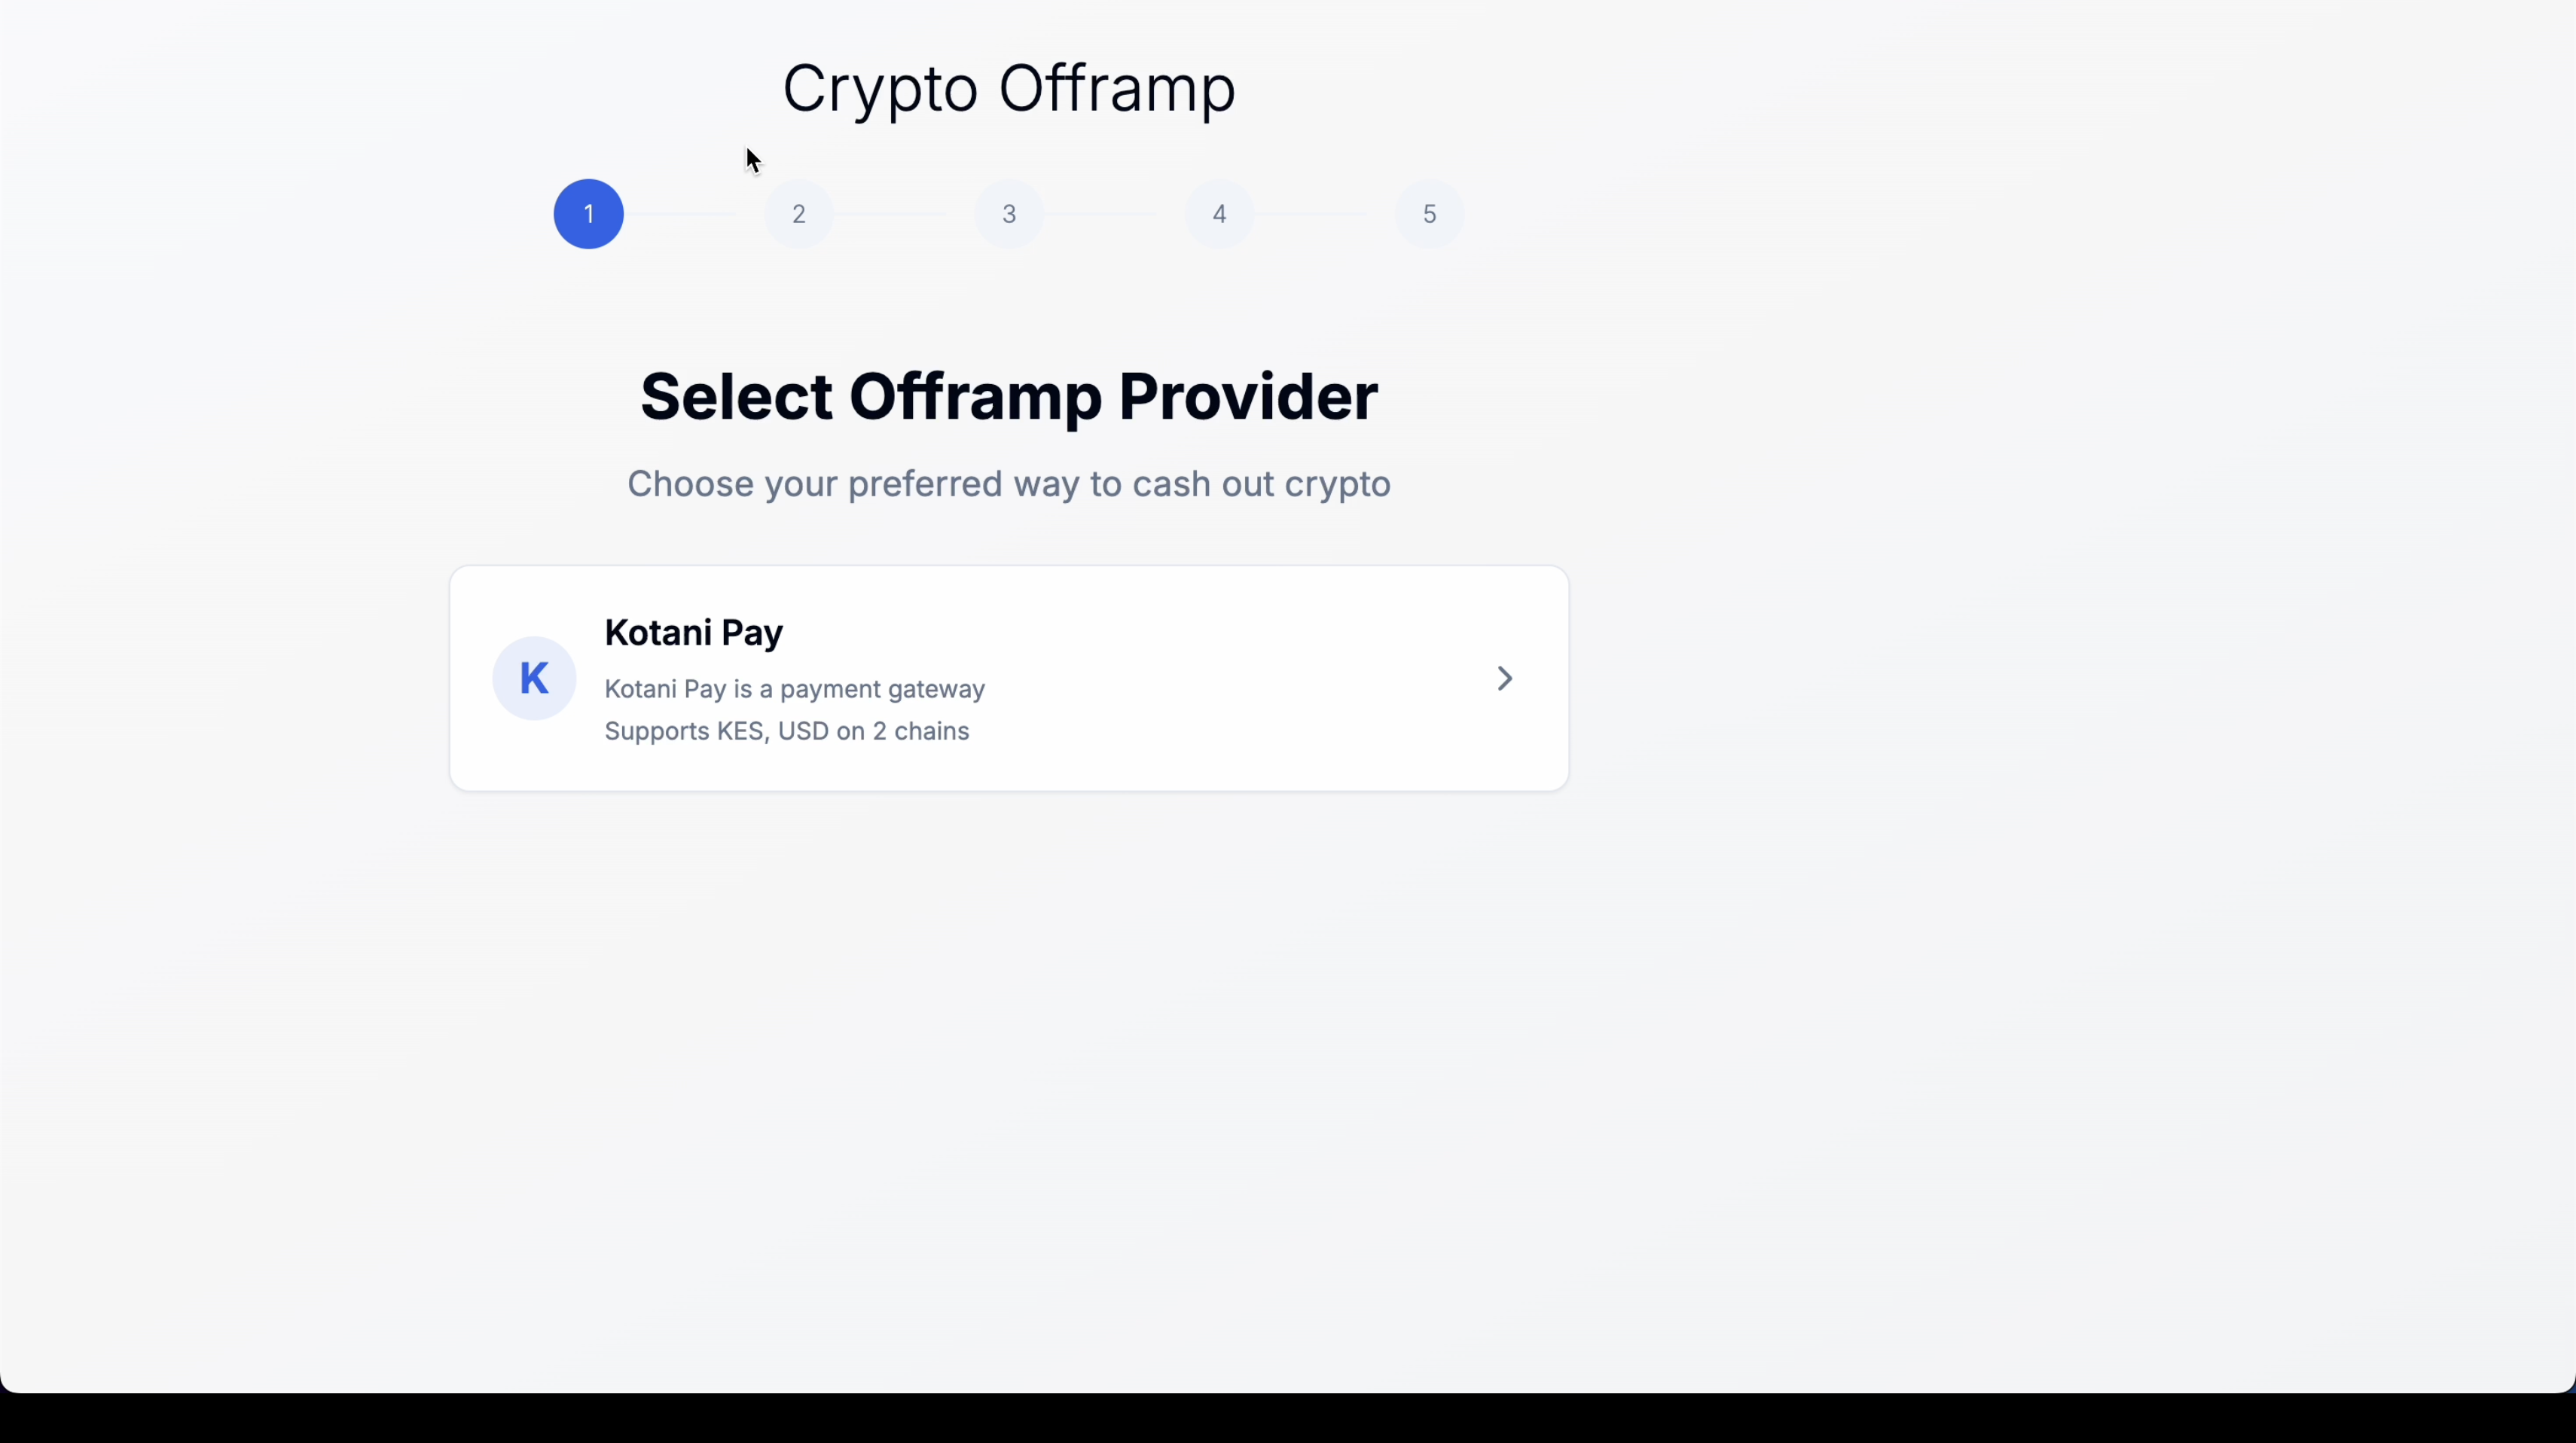
Step 1: Select an Offramping Provider
Navigate to the Crypto Offramp section in the Rahat portal and select Kotani Pay as your preferred provider. Kotani Pay supports cash-outs into mobile money services such as M-PESA and MTN, with options in both KES and USD.
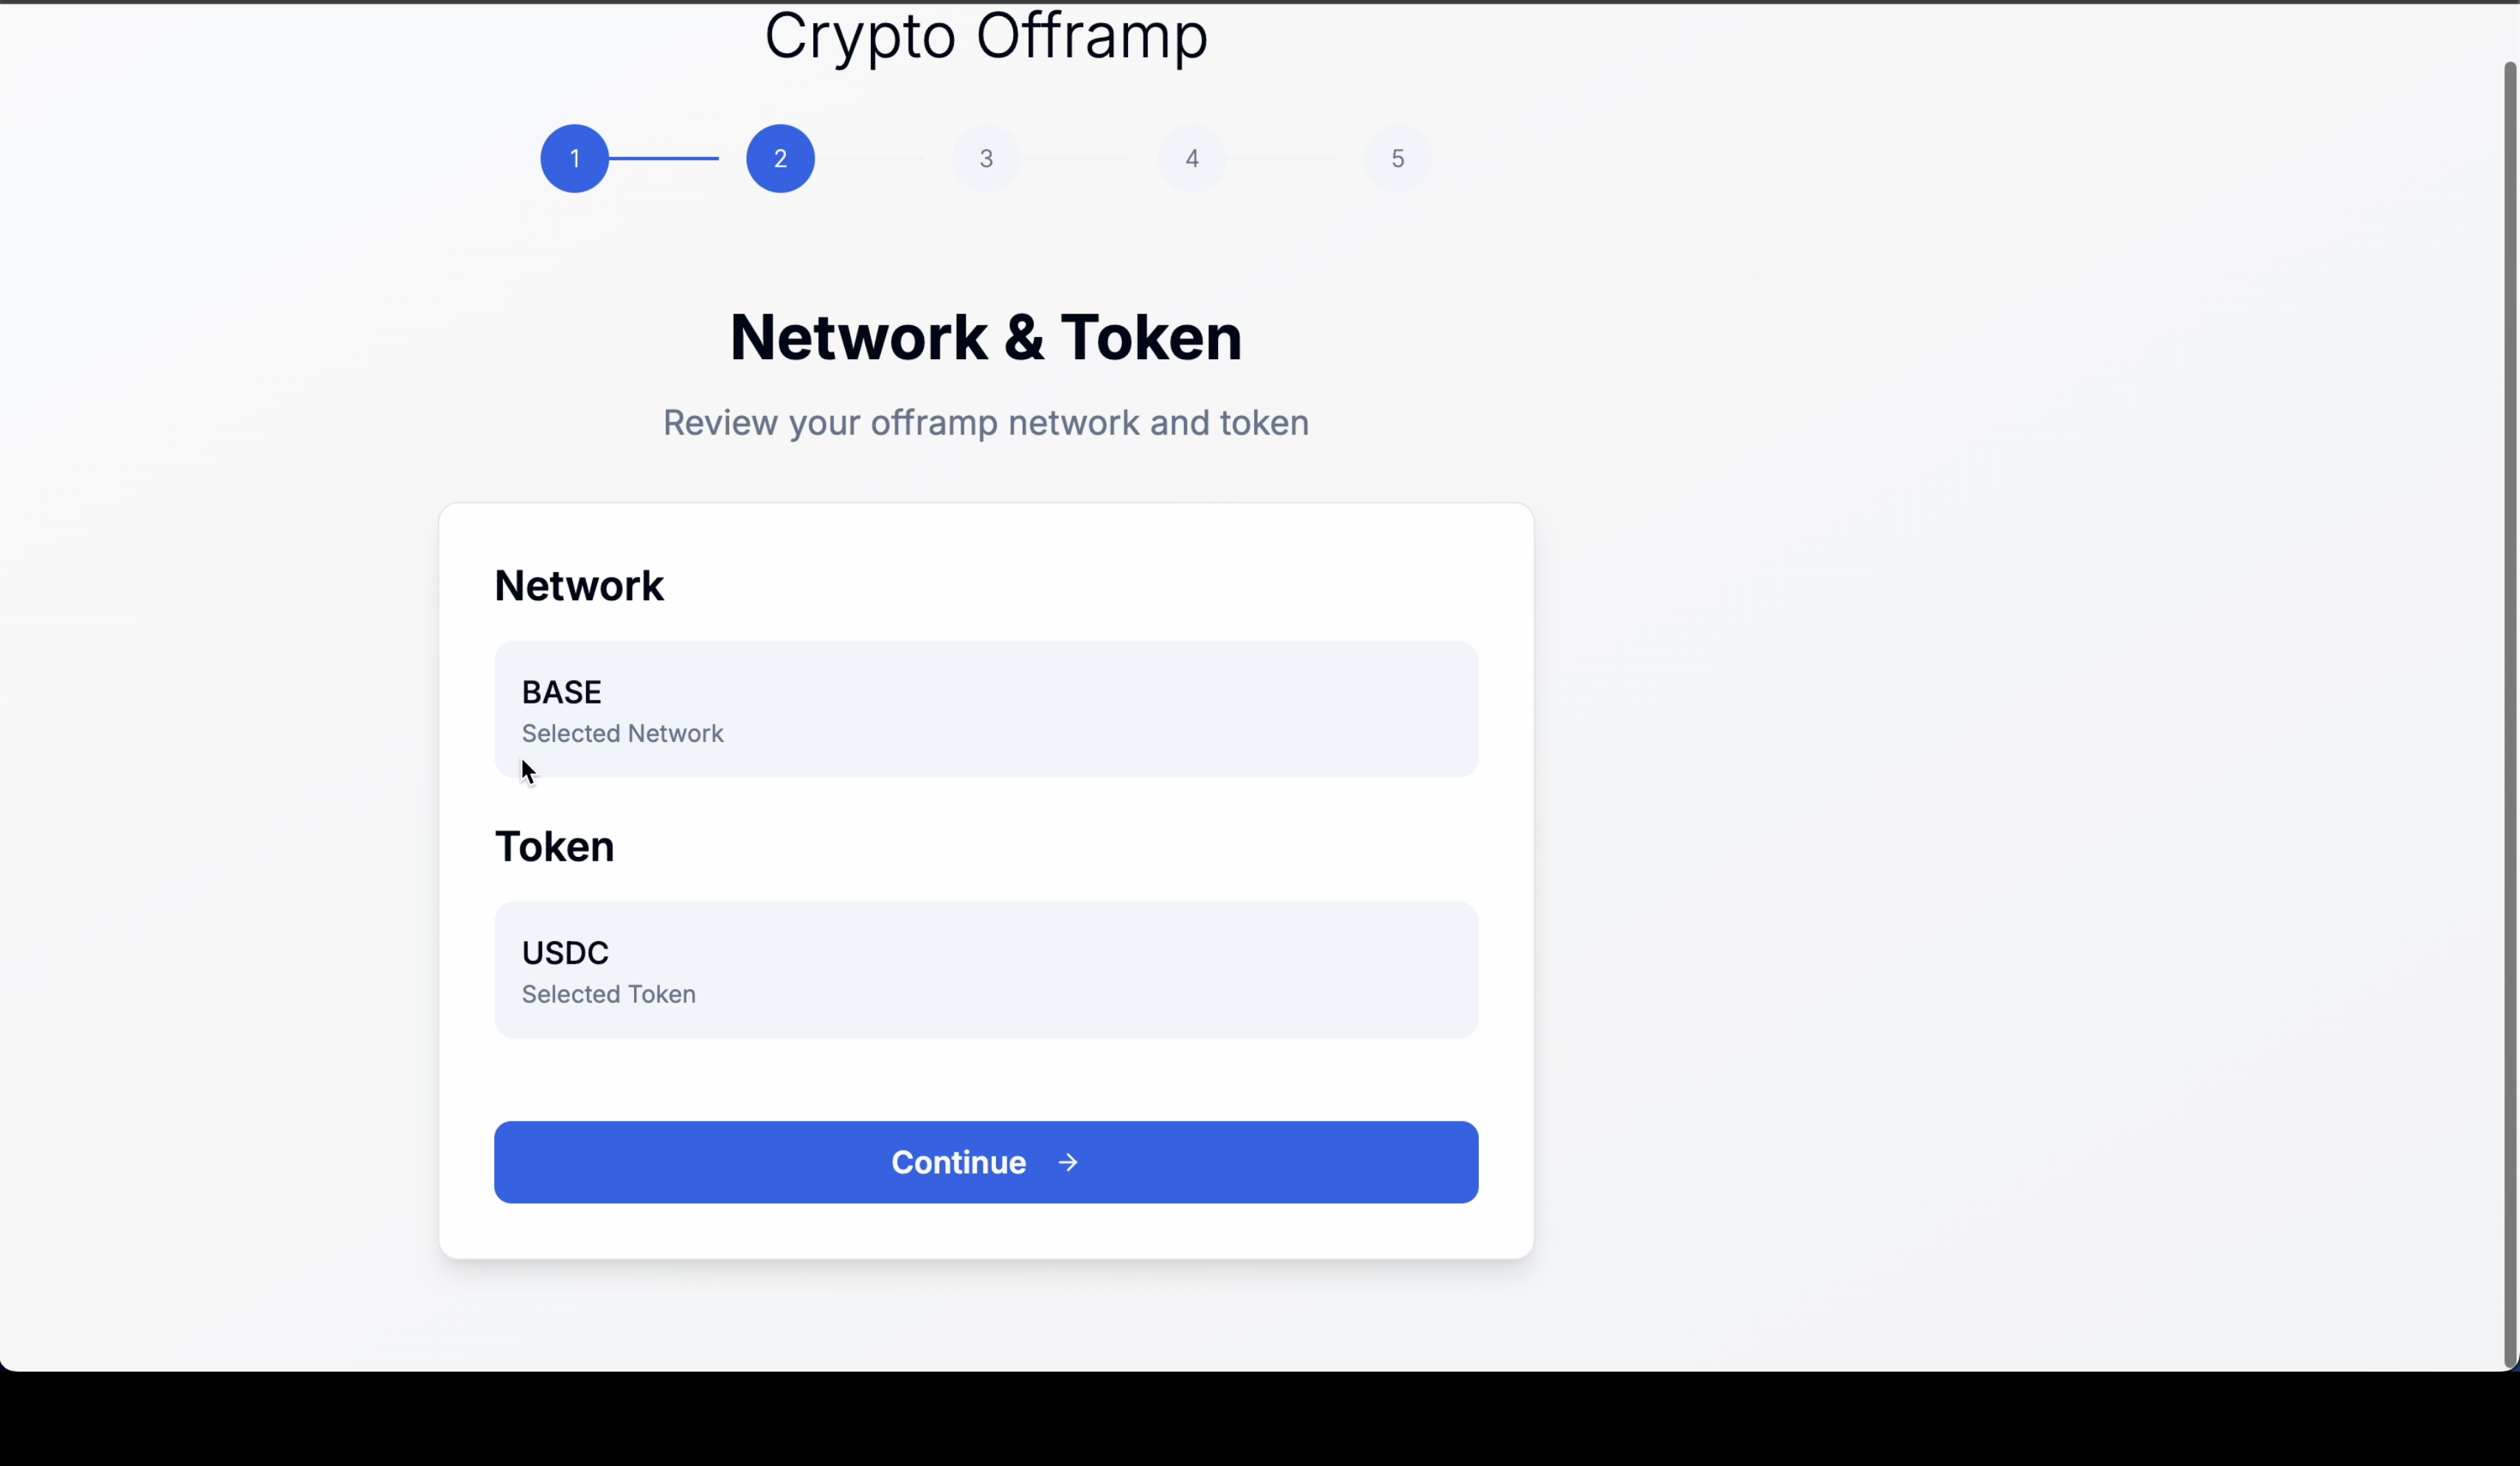
Step 2: Choose Network and Token
Choose the blockchain network you want to use (for example, BASE) and select the token to offramp (USDC). Click Continue to proceed.
Step 3: Fill Offramp Details
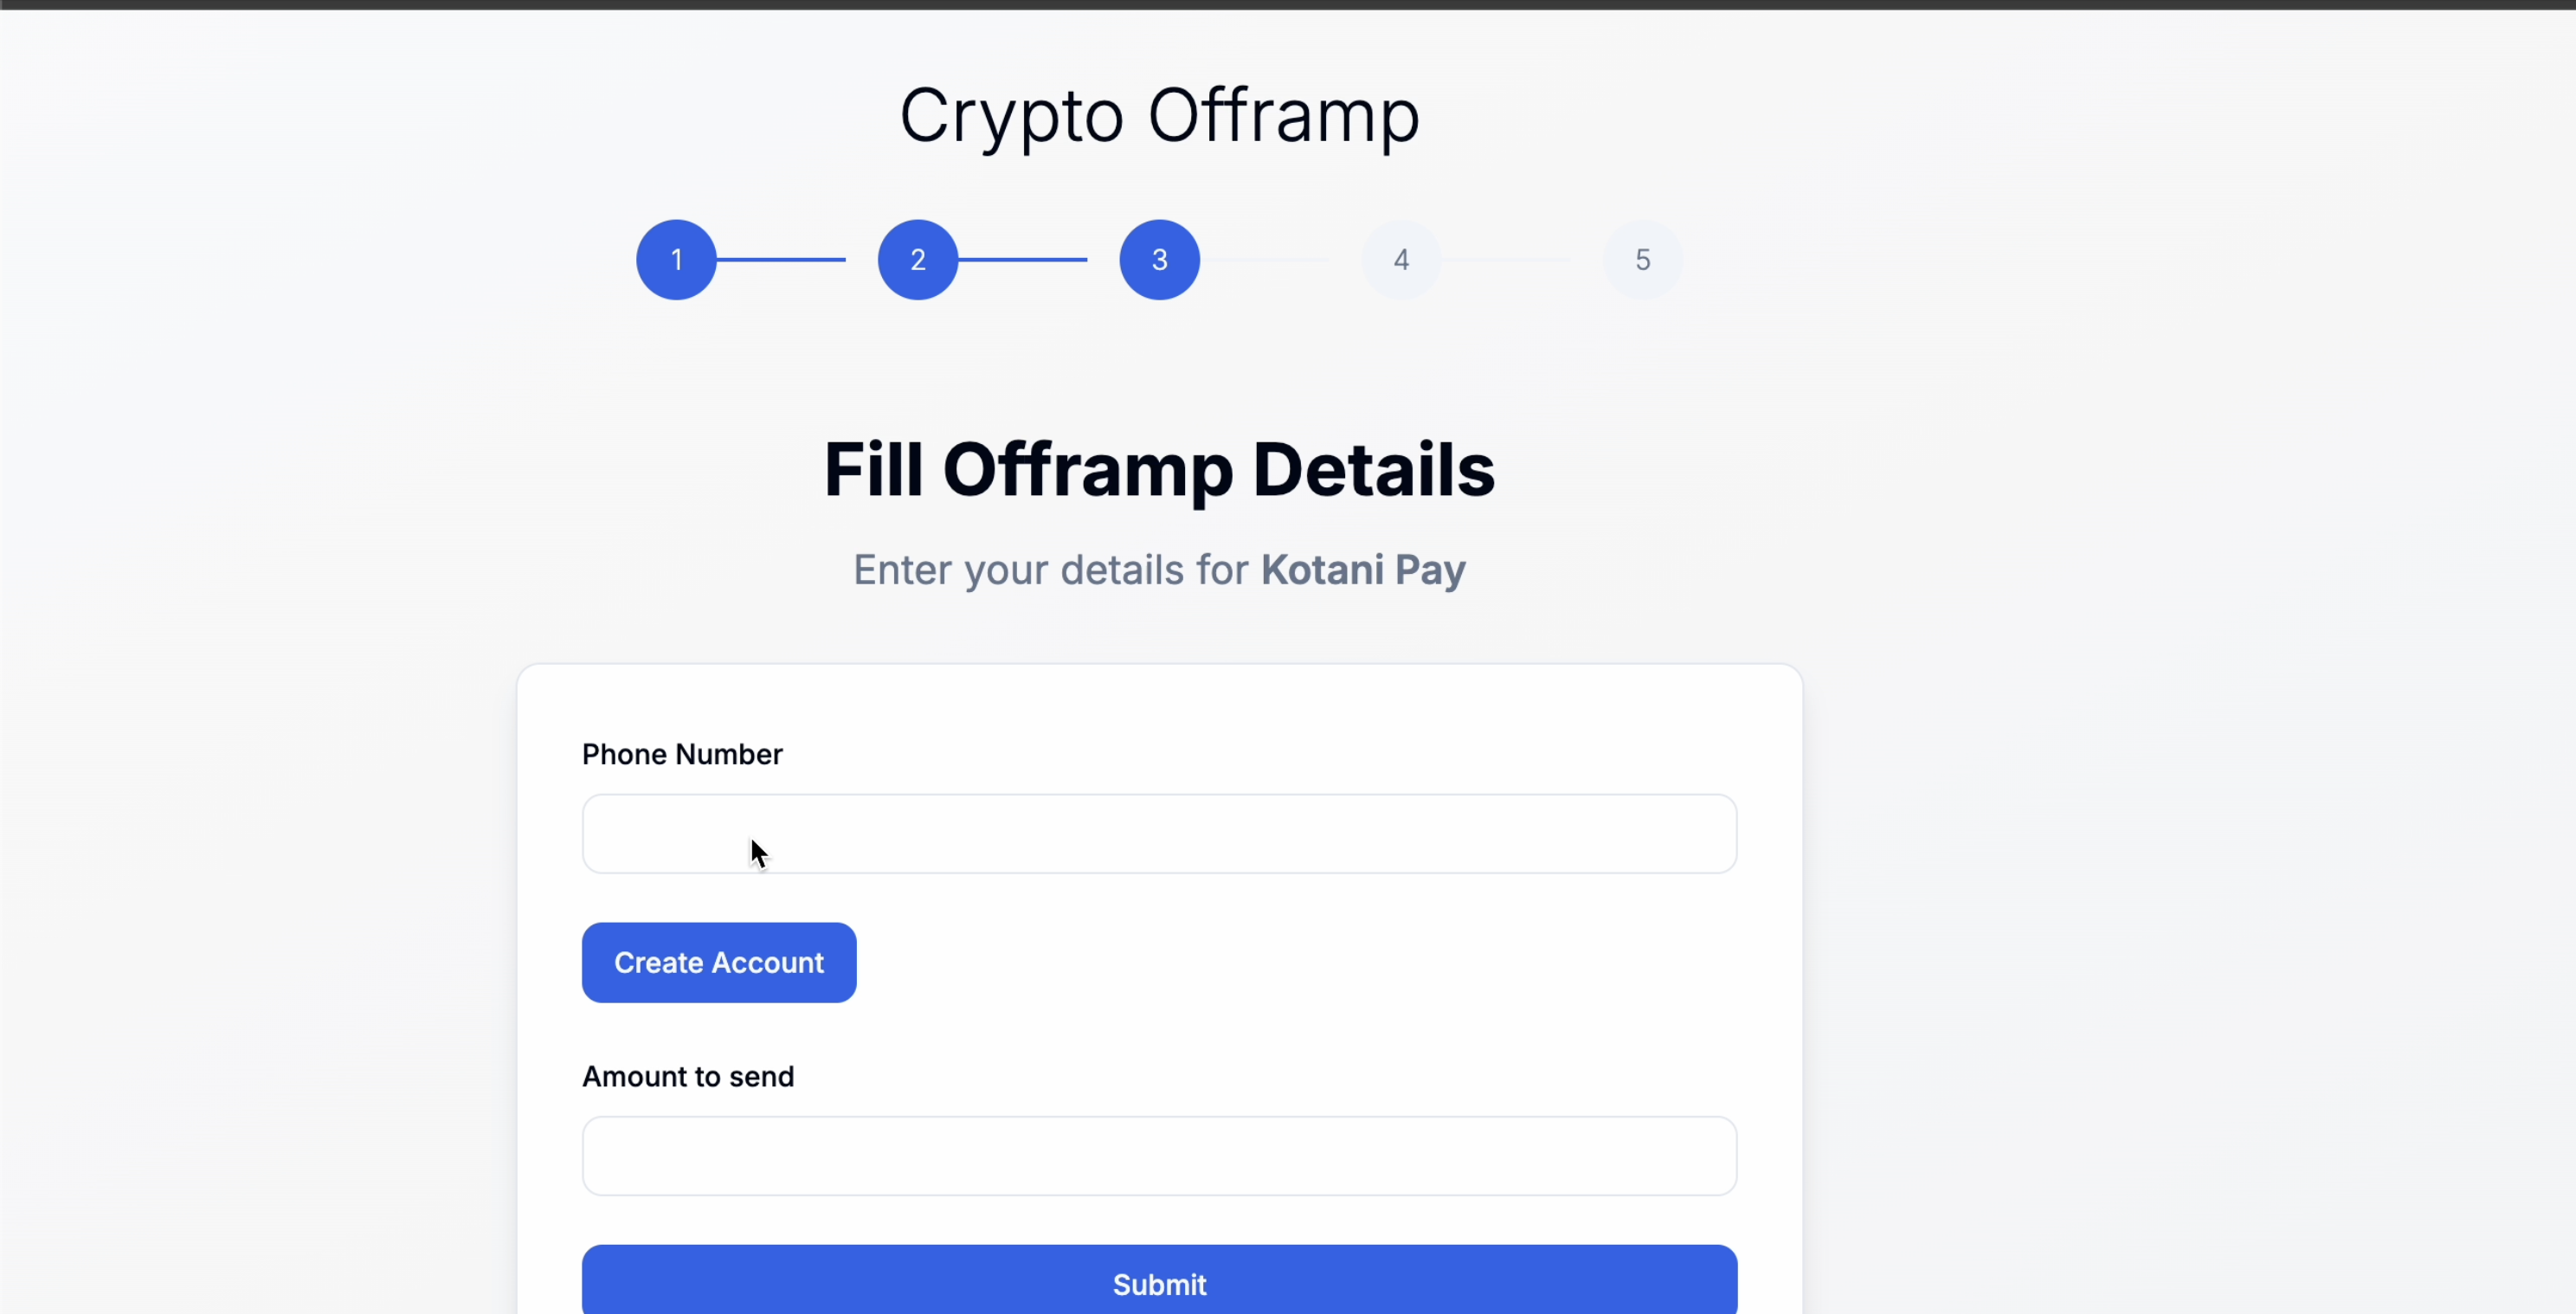
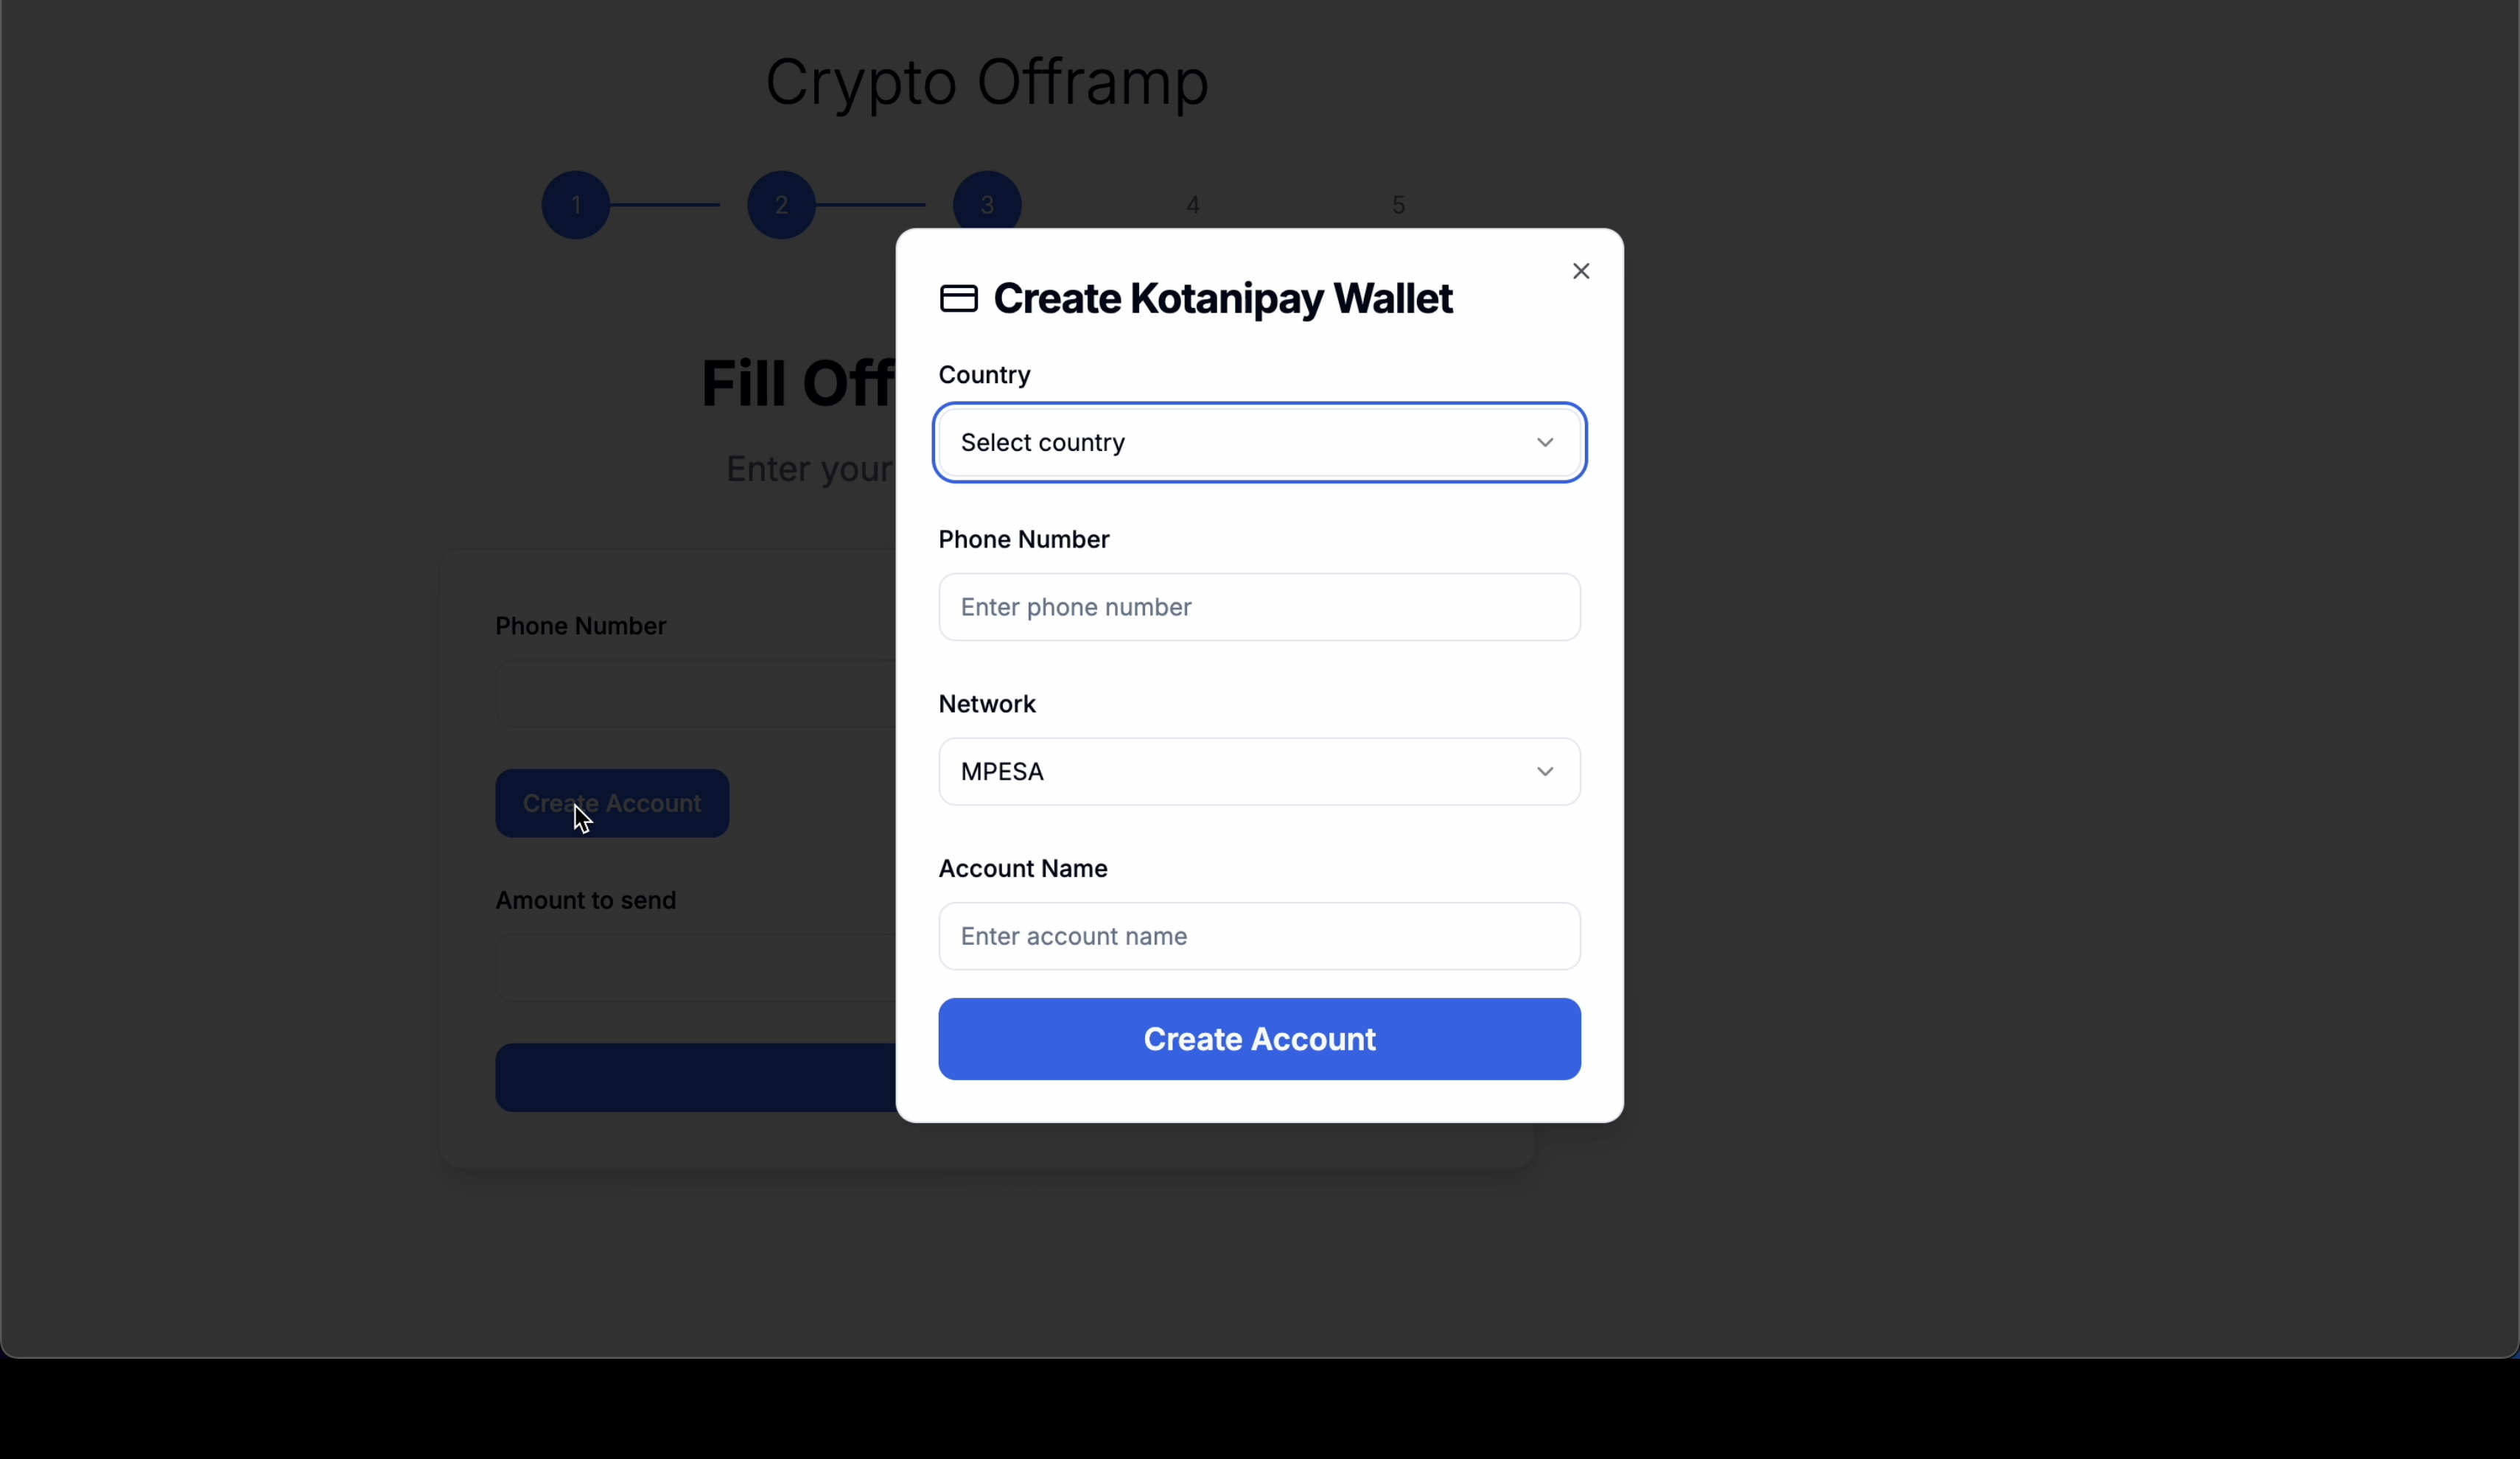
Provide your mobile money details by entering your phone number. The system will check if this number is linked to a Kotani Pay account. If no account exists, create one by selecting your country, mobile money network (M-PESA or MTN), and entering your account name. Click Create Account once completed.
Step 4: Enter Amount to Offramp
Enter the amount of USDC to convert (e.g., 0.01 USDC). Review wallet details carefully before clicking Submit.
Step 5: Send USDC to the Given Wallet Address
The system generates a destination wallet address. Send exactly the amount of USDC from your connected wallet (e.g., MetaMask). Click Send Crypto and confirm the transaction in your wallet.
Step 6: Monitor Transaction Status
After submitting the transfer, a real-time status page will display:
- Wallet and customer details
- Amount of USDC being offramped
- Fiat equivalent
- Exchange rate and transaction fee
- Current transaction status (Pending or Completed)
Support Resources
- Technical team for Gnosis Safe setup
- Project configuration guides
- Beneficiary onboarding documentation
- Transaction troubleshooting
- Offramping process guides
- Admin dashboard tutorials
Need Help?
If you encounter any issues or need additional support, please contact our technical team or refer to the specific guides mentioned throughout this documentation.